Saturday, July 22, 2017

How to setup an Angular 2 and TypeScript project with Visual Studio 2017

Copyright from: adrientorris.github.io

You can see the source code of this tutorial on my GitHub repository, here : Angular2 web app source code on GitHub.
Versions :
  • ASP.NET Core : 1.1.0
  • Angular : 2.2.0
  • TypeScript : 2.0.0
  • Visual Studio : 2017 RC

Create new ASP.NET Core web application
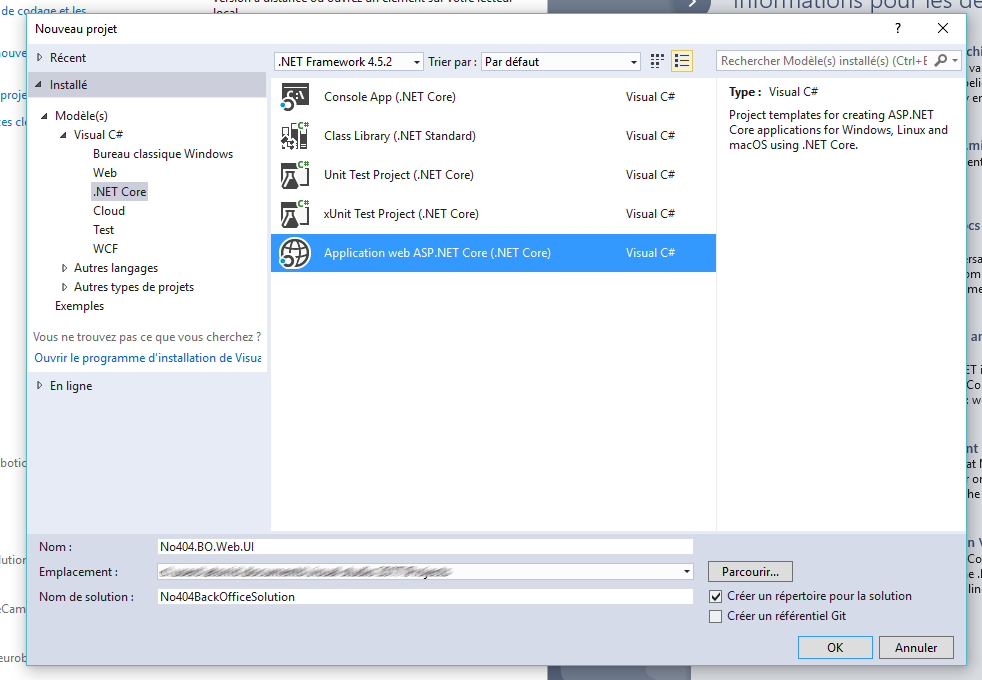
How to setup an Angular 2 and TypeScript project with Visual Studio 2017
  • Choose an empty project to start from zero
  • Choose no authentication
  • Don't enable the docker container support (I will make a tutorial on Docker next)
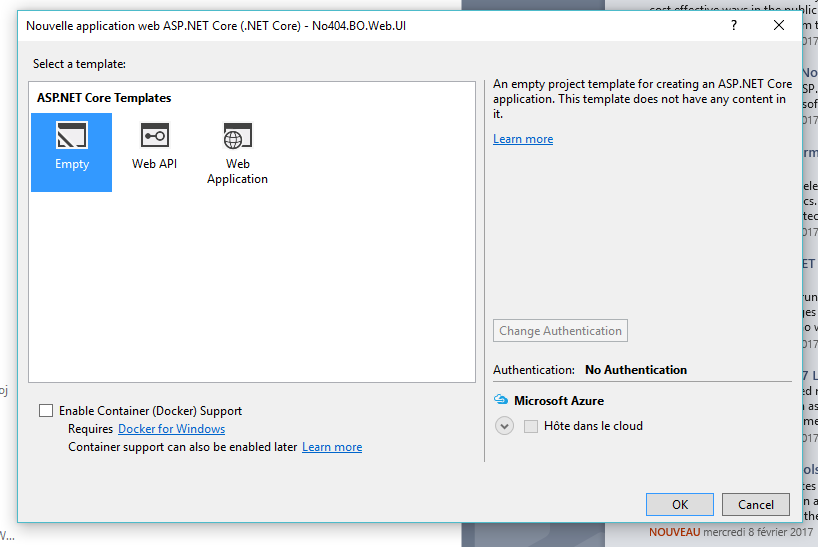
How to setup an Angular 2 and TypeScript project with Visual Studio 2017

Create the MVC folders structure

What is MVC ?
MVC, for Model-View-Controller is an architectural pattern who separates an application into three main components :
  • The Model
  • The View
  • The Controller
The purpose of this architectural pattern is to build applications that are easily maintenable and testable, separating differents components. A best practice is to pair this architectural pattern with an N-Tier layers architecture.
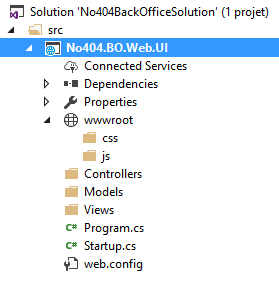
  • Create the folder "Models", who contains classes that represent some data, validation logic and business rules
  • Create the folder "Views", who contains views who are the components that displays the user interfaces
  • Create the folder "Controllers", who contains the controllers, classes that handles the browser requests. Controllers handles and responds to user input and interaction
  • Create the "wwwroot" subfolders, who contains static files to serve, like JavaScript files, css and images
How to setup an Angular 2 and TypeScript project with Visual Studio 2017

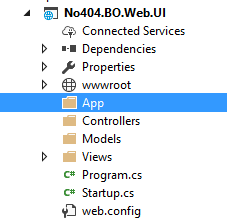
Create a folder where put the TypeScript files
How to setup an Angular 2 and TypeScript project with Visual Studio 2017

Set TypeScript configuration

If TypeScript is the primary language for Angular application development, it can't be executed by the browsers directly; TypeScript must be "transpiled" into JavaScript using the tsc compiler, which requires some configuration.
To configure the TypeScript compiler and set your environment, you have two files to add :
  • tsconfig.json, the TypeScript compiler configuration file
  • typings, the TypeScript type definition files file

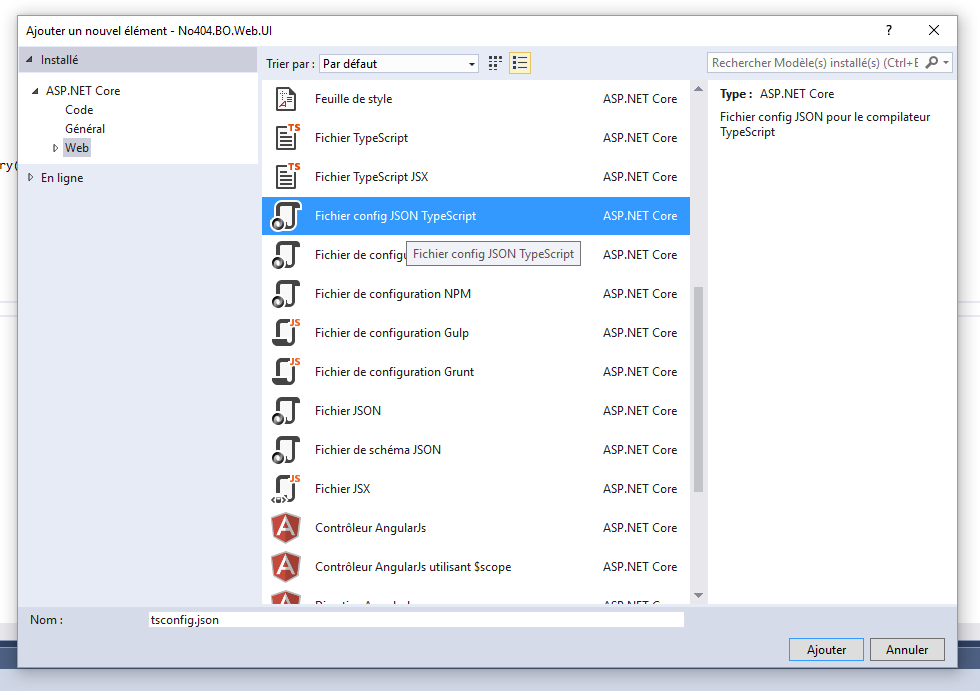
tsconfig.json

The TypeScript configuration file is required to guide the TypeScript compiler as it generates JavaScript files which are used by the browser.
How to setup an Angular 2 and TypeScript project with Visual Studio 2017
This is the default content when you add the tsconfig.json file to your project :

{
  "compilerOptions": {
    "noImplicitAny": false,
    "noEmitOnError": true,
    "removeComments": false,
    "sourceMap": true,
    "target": "es5"
  },
  "exclude": [
    "node_modules",
    "wwwroot"
  ]
}
So, what do we have in this file ?
The compilerOptions section is optional, if its null default values will be use. You can find the details of this section here : http://www.typescriptlang.org/docs/handbook/compiler-options.html
If you want more information about this file, you can read the documentation : http://www.typescriptlang.org/docs/handbook/tsconfig-json.html
For our project, we have to specify where the tsc can find our TypeScript files and where we want it generates the JavaScript files, and some other settings. This is the content we need :

{
  "compilerOptions": {
    "target": "es6",
    "module": "commonjs",
    "moduleResolution": "node",
    "sourceMap": true,
    "emitDecoratorMetadata": true,
    "experimentalDecorators": true,
    "removeComments": true,
    "suppressImplicitAnyIndexErrors": true,
    "rootDir": "App",
    "outDir": "wwwroot/app"
  },
  "compileOnSave": true,
  "angularCompilerOptions": {
    "genDir": ".",
    "debug": true
  },
  "exclude": [
    "node_modules",
    "wwwroot"
  ]
}

TypeScript type definition files

Many JavaScript libraries, such as jQuery, extend the JavaScript environment with syntax and features that the TypeScript compiler doesn't recognize natively. This file tell the compiler about the libraries you load.

{
  "globalDependencies": {
    "jquery": "registry:dt/jquery",
    "jasmine": "registry:dt/jasmine"
  }
}

Add a NPM configuration file

What is NPM ?

NPM, for Node Package Manager, is a utility that aids JavaScript open source package installation, version and dependency management. NPM is distributed with Node.js, which is an asynchronous event driven JavaScript runtime, designed to build scalable network applications.
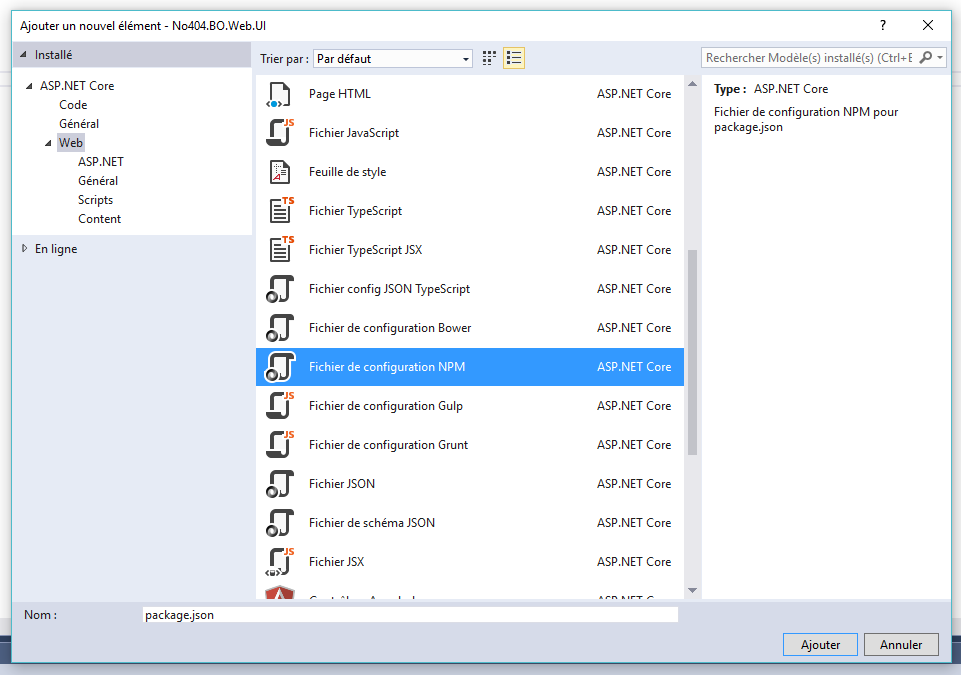
Angular 2 and its dependencies are delivered through NPM, so you need to add the NPM configuration file in your project, package.json.
How to setup an Angular 2 and TypeScript project with Visual Studio 2017
You will have an empty NPM configuration file :

{
  "version": "1.0.0",
  "name": "asp.net",
  "private": true,
  "devDependencies": {
  }
}
To add Angular 2 and its dependencies to your projects, you have to add some dependencies in your NPM configuration file :

{
  "version": "1.0.0",
  "description": "NO404 administration panel",
  "name": "no404 backoffice",
  "readme": "no404 backoffice",
  "license": "MIT",
  "dependencies": {
    "@angular/common": "~2.2.0",
    "@angular/compiler": "~2.2.0",
    "@angular/core": "~2.2.0",
    "@angular/forms": "~2.2.0",
    "@angular/http": "~2.2.0",
    "@angular/platform-browser": "~2.2.0",
    "@angular/platform-browser-dynamic": "~2.2.0",
    "@angular/router": "~3.2.0",
    "@angular/upgrade": "~2.2.0",

    "angular-in-memory-web-api": "~0.1.15",
    "core-js": "^2.4.1",
    "reflect-metadata": "^0.1.8",
    "rxjs": "5.0.0-beta.12",
    "systemjs": "0.19.39",
    "zone.js": "^0.6.25",

    "bower": "1.7.9",
    "jquery": "^3.1.0"
  },
  "devDependencies": {
    "@types/core-js": "^0.9.34",
    "@types/node": "^6.0.45",
    "concurrently": "^2.2.0",
    "gulp": ">=3.9.1",
    "gulp-concat": ">=2.5.2",
    "gulp-copy": ">=0.0.2",
    "gulp-cssmin": ">=0.1.7",
    "gulp-load-plugins": "^1.3.0",
    "gulp-rename": ">=1.2.2",
    "gulp-rimraf": ">=0.2.0",
    "gulp-tsc": ">=1.2.0",
    "gulp-uglify": ">=1.2.0",
    "gulp-watch": ">=4.3.9",
    "gulp-clean-css": "^3.0.4",
    "gulp-clean": "^0.3.2",
    "jasmine-core": "2.4.1",
    "tslint": "^3.15.1",
    "typescript": "^2.0.0",
    "typings": "^1.3.2"
  },
  "scripts": {
    "start": "concurrently \"npm run gulp\" \"npm run watch\" \"npm run tsc:w\"",
    "postinstall": "typings install",
    "tsc": "tsc",
    "tsc:w": "tsc -w",
    "typings": "typings",
    "gulp": "gulp",
    "watch": "gulp watch",
    "ngc": "ngc"
  }
}
If you open your web application in the folder explorer, you can now see a node_modules folder with some external dependencies in there :
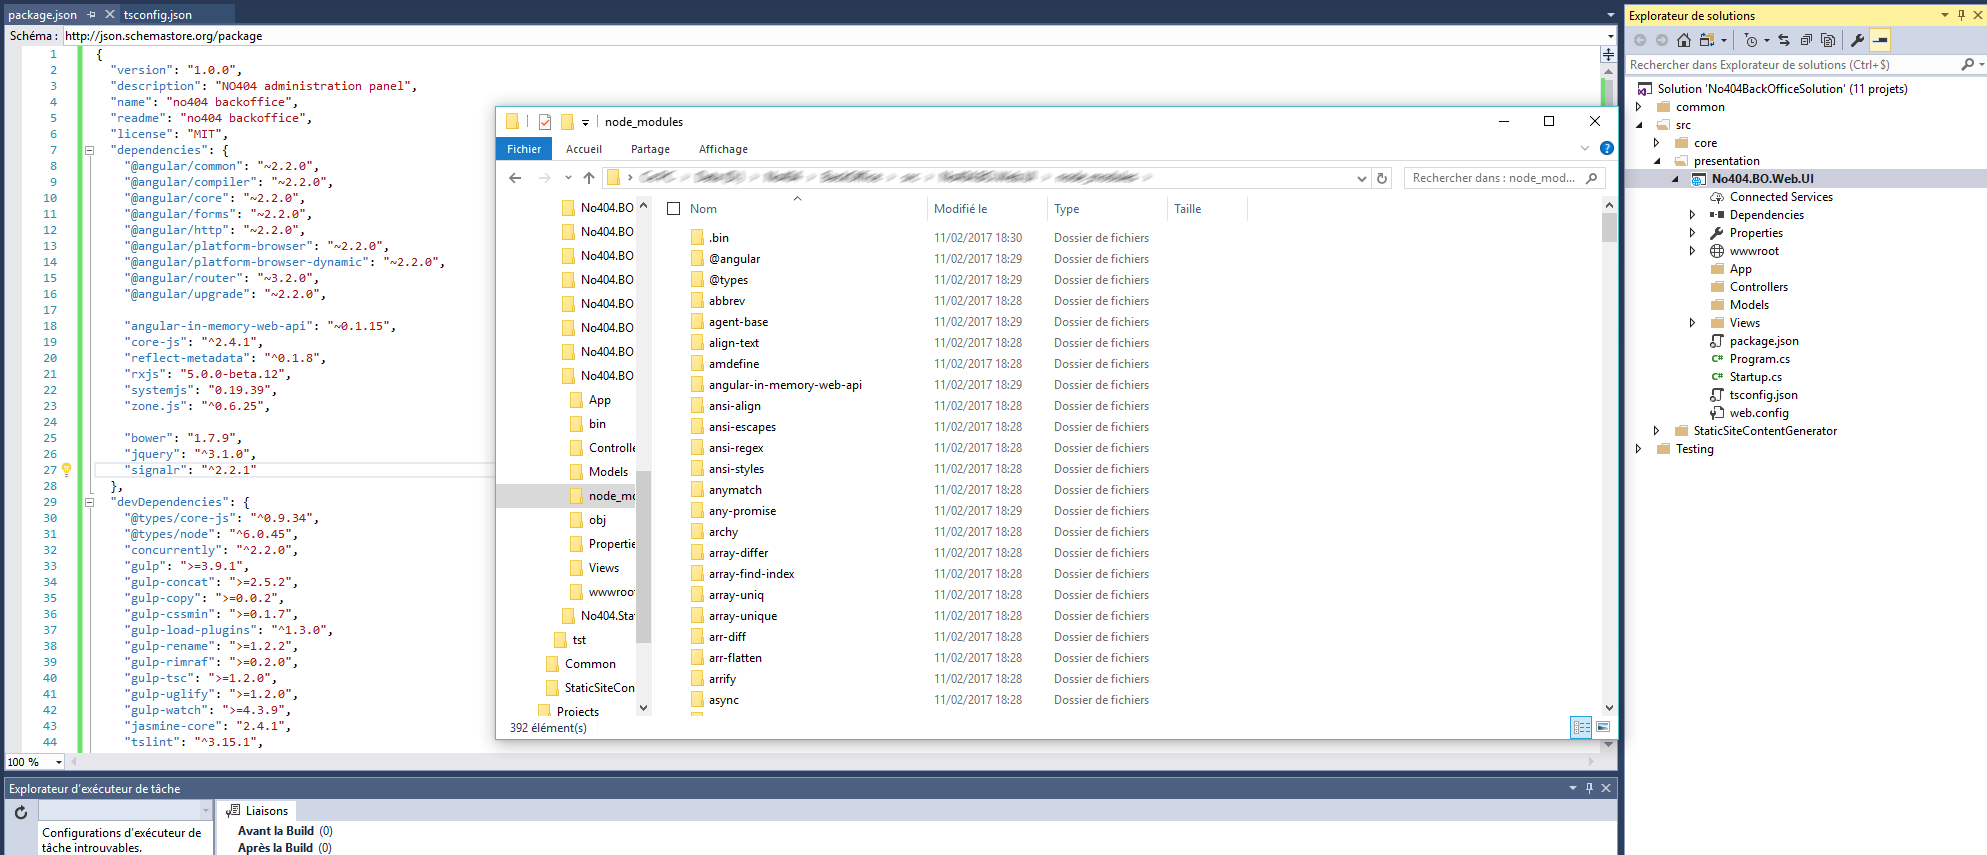
How to setup an Angular 2 and TypeScript project with Visual Studio 2017

Add Gulp

Add gulp.config.js

module.exports = function () {

    var base = {
        webroot: "./wwwroot/",
        node_modules: "./node_modules/"
    };

    var config = {
        /**
         * Files paths
         */
        angular: base.node_modules + "@angular/**/*.js",
        app: "App/**/*.*",
        appDest: base.webroot + "app",
        js: base.webroot + "js/*.js",
        jsDest: base.webroot + 'js',
        css: base.webroot + "css/*.css",
        cssDest: base.webroot + 'css',
        lib: base.webroot + "lib/",
        node_modules: base.node_modules,
        angularWebApi: base.node_modules + "angular2-in-memory-web-api/*.js",
        corejs: base.node_modules + "core-js/client/shim*.js",
        zonejs: base.node_modules + "zone.js/dist/zone*.js",
        reflectjs: base.node_modules + "reflect-metadata/Reflect*.js",
        systemjs: base.node_modules + "systemjs/dist/*.js",
        rxjs: base.node_modules + "rxjs/**/*.js",
        jasminejs: base.node_modules + "jasmine-core/lib/jasmine-core/*.*"
    };

    return config;
};
Add the gulp configuration file
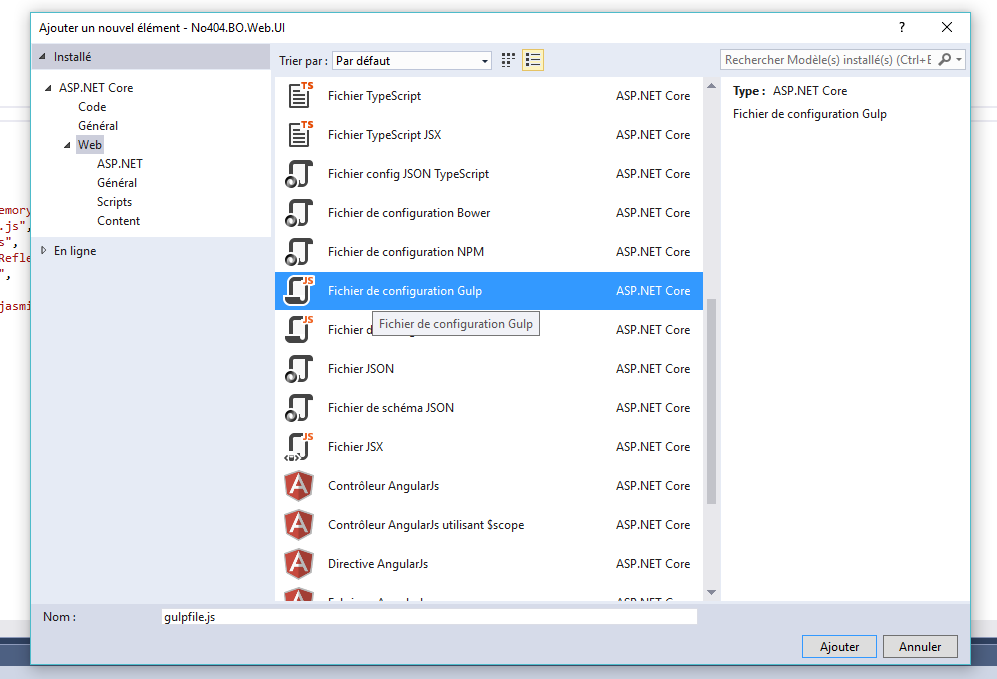
How to setup an Angular 2 and TypeScript project with Visual Studio 2017

/*
This file is the main entry point for defining Gulp tasks and using Gulp plugins.
Click here to learn more. https://go.microsoft.com/fwlink/?LinkId=518007
*/

var gulp = require('gulp');

gulp.task('default', function () {
    // place code for your default task here
});

/// 
"use strict";

var gulp = require('gulp');
var config = require('./gulp.config')();
var cleanCSS = require('gulp-clean-css');
var clean = require('gulp-clean');
var rename = require('gulp-rename');
var $ = require('gulp-load-plugins')({ lazy: true });

gulp.task("clean:js", function (cb) {
    //return $.rimraf('wwwroot/js/*.min.js', cb);
    return gulp.src('wwwroot/js/*.min.js', { read: false }).pipe(clean());
});

gulp.task("clean:css", function (cb) {
    //return $.rimraf('wwwroot/css/*.min.css', cb);
    return gulp.src('wwwroot/css/*.min.css', { read: false }).pipe(clean());
});

gulp.task('minify:css', function () {
    return gulp.src(config.css)
        .pipe(cleanCSS())
        .pipe(rename({
            suffix: '.min'
        }))
        .pipe(gulp.dest(config.cssDest));
});

gulp.task("clean", ["clean:js", "clean:css"]);
gulp.task('minify', ['minify:css']);

gulp.task("copy:angular", function () {

    return gulp.src(config.angular,
        { base: config.node_modules + "@angular/" })
        .pipe(gulp.dest(config.lib + "@angular/"));
});

gulp.task("copy:angularWebApi", function () {
    return gulp.src(config.angularWebApi,
        { base: config.node_modules })
        .pipe(gulp.dest(config.lib));
});

gulp.task("copy:corejs", function () {
    return gulp.src(config.corejs,
        { base: config.node_modules })
        .pipe(gulp.dest(config.lib));
});

gulp.task("copy:zonejs", function () {
    return gulp.src(config.zonejs,
        { base: config.node_modules })
        .pipe(gulp.dest(config.lib));
});

gulp.task("copy:reflectjs", function () {
    return gulp.src(config.reflectjs,
        { base: config.node_modules })
        .pipe(gulp.dest(config.lib));
});

gulp.task("copy:systemjs", function () {
    return gulp.src(config.systemjs,
        { base: config.node_modules })
        .pipe(gulp.dest(config.lib));
});

gulp.task("copy:rxjs", function () {
    return gulp.src(config.rxjs,
        { base: config.node_modules })
        .pipe(gulp.dest(config.lib));
});

gulp.task("copy:app", function () {
    return gulp.src(config.app)
        .pipe(gulp.dest(config.appDest));
});

gulp.task("copy:jasmine", function () {
    return gulp.src(config.jasminejs,
        { base: config.node_modules + "jasmine-core/lib" })
        .pipe(gulp.dest(config.lib));
});

gulp.task("dependencies", [
    "copy:angular",
    "copy:angularWebApi",
    "copy:corejs",
    "copy:zonejs",
    "copy:reflectjs",
    "copy:systemjs",
    "copy:rxjs",
    "copy:jasmine",
    "copy:app"
]);

gulp.task("watch", function () {
    return $.watch(config.app)
        .pipe(gulp.dest(config.appDest));
});

gulp.task("default", ["clean", 'minify', "dependencies"]);
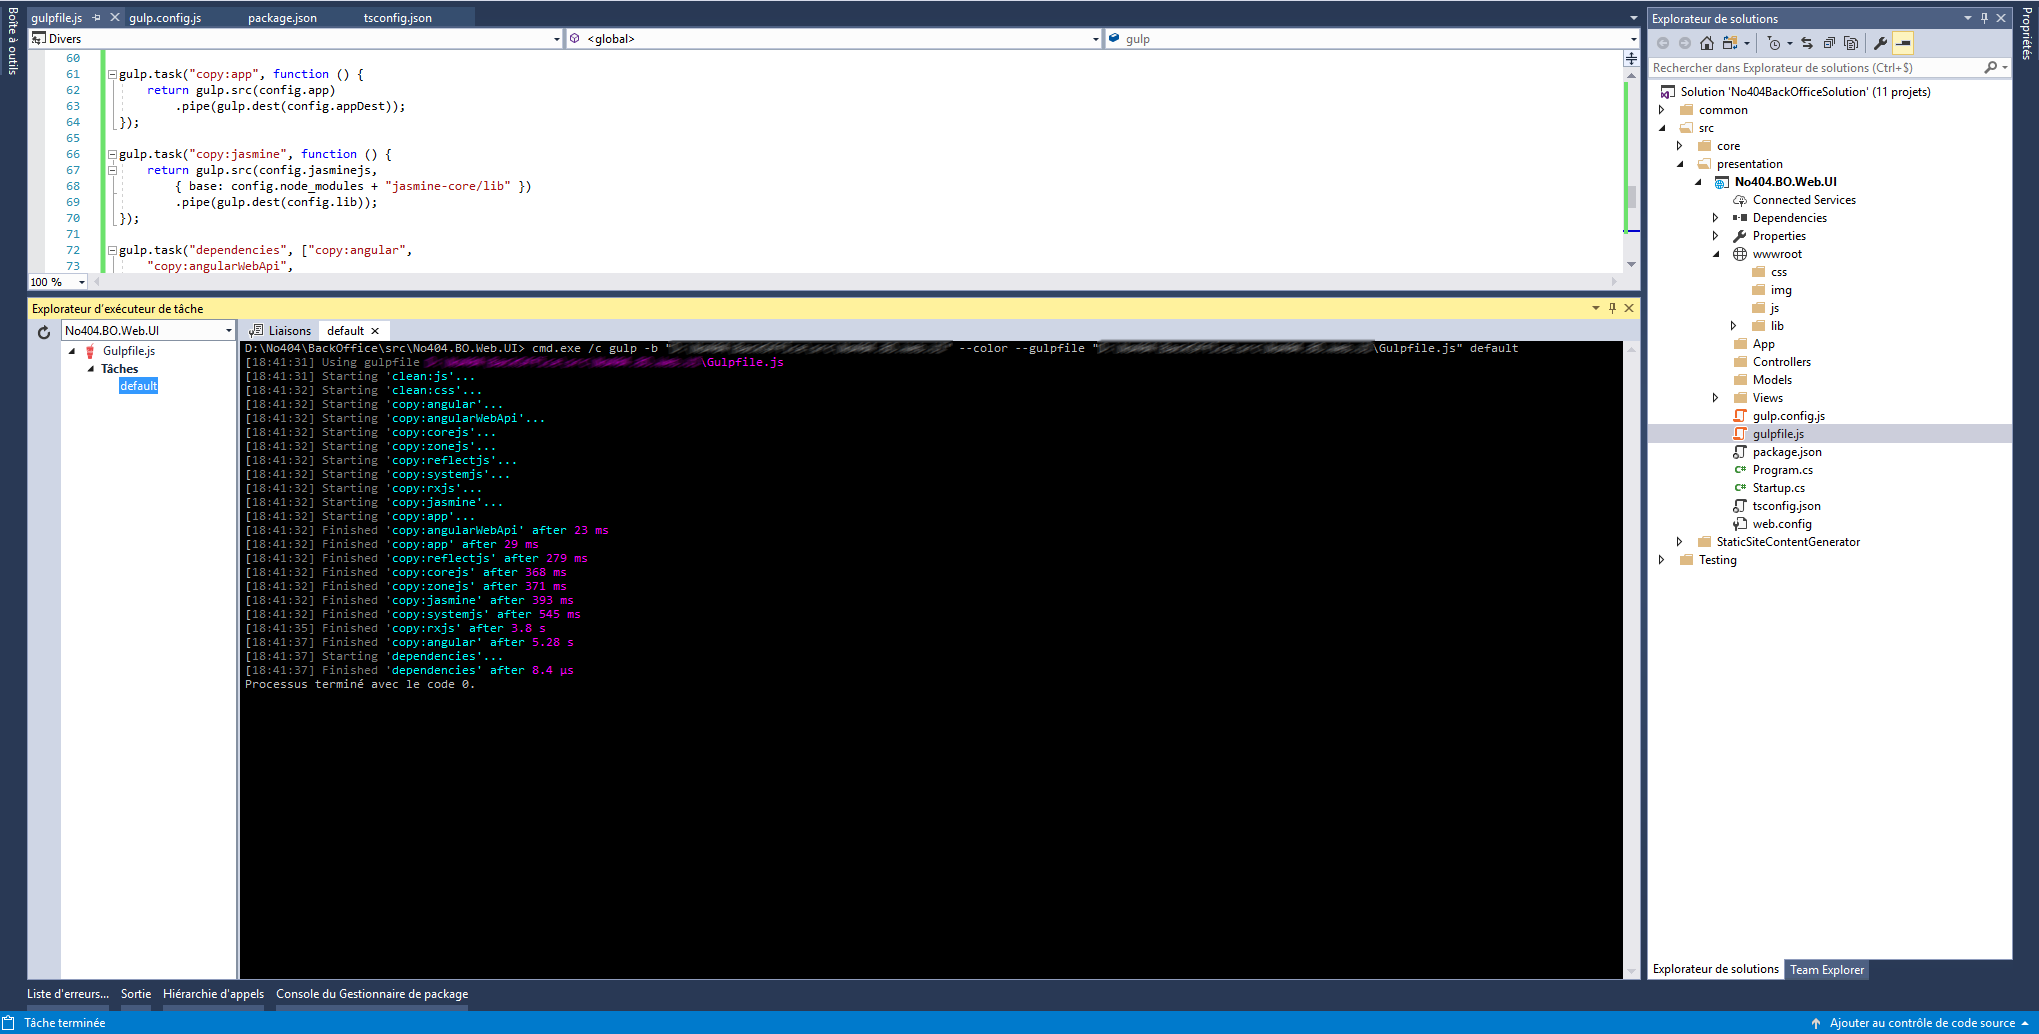
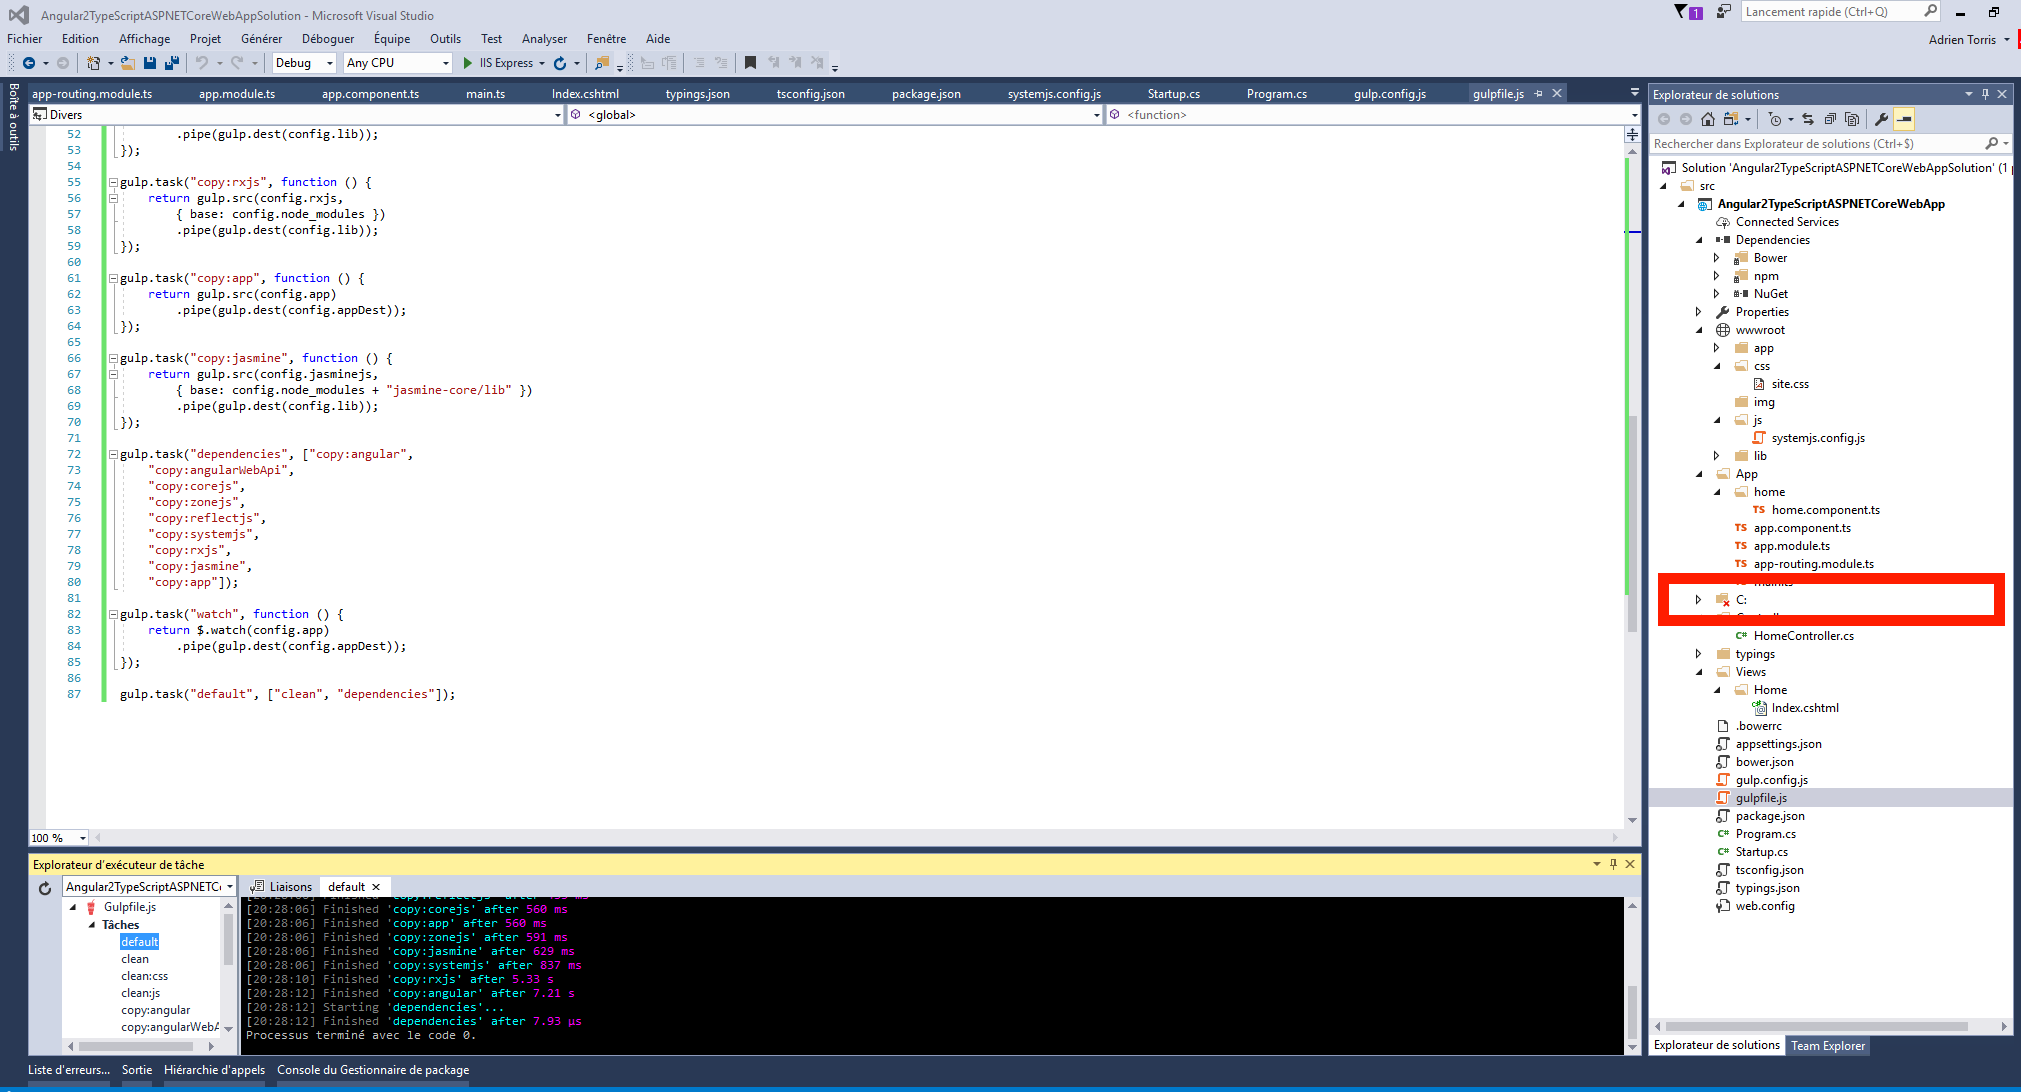
You can see now a task "default" in the task explorator
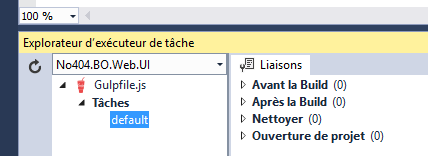
How to setup an Angular 2 and TypeScript project with Visual Studio 2017
You can see that the dependencies has been added in the lib folder.
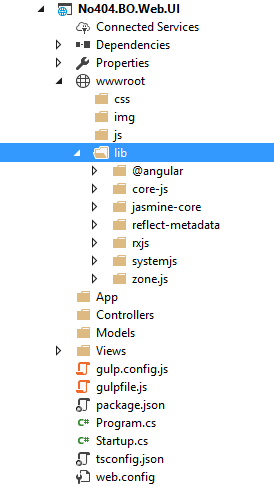
How to setup an Angular 2 and TypeScript project with Visual Studio 2017

Add Bower

Add bower to add jquery and boostrap dependencies
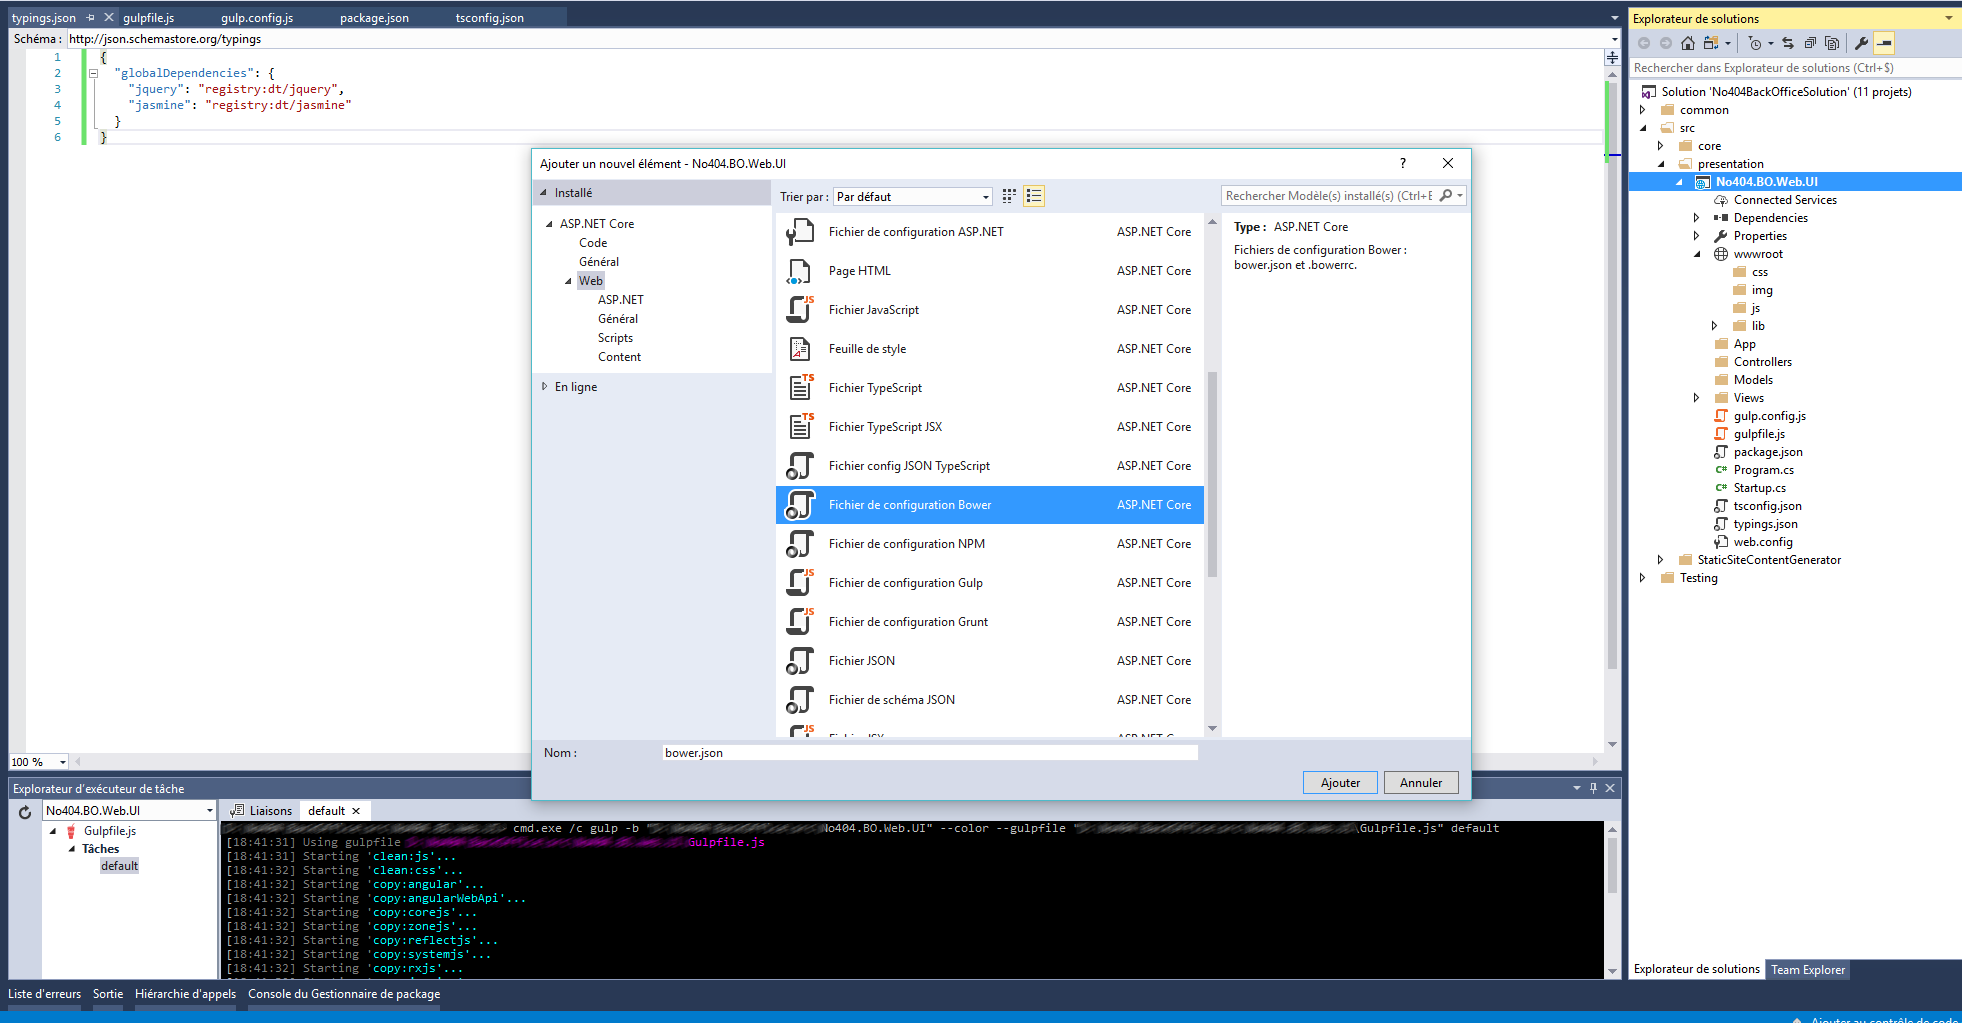
How to setup an Angular 2 and TypeScript project with Visual Studio 2017

Create TypeScript app files

Create the main file to bootstrap your application

import { platformBrowserDynamic } from '@angular/platform-browser-dynamic';
import { AppModule } from './app.module';

const platform = platformBrowserDynamic();

platform.bootstrapModule(AppModule);
Add app.module.ts

import { NgModule } from '@angular/core';
import { BrowserModule } from '@angular/platform-browser';
import { HttpModule } from '@angular/http';

import { AppComponent } from './app.component';
import { HomeComponent } from './home/home.component';
import { AppRoutingModule } from './app-routing.module';

@NgModule({
    imports: [
        BrowserModule,
        HttpModule,
        AppRoutingModule
    ],
    declarations: [
        AppComponent,
        HomeComponent
    ],
    bootstrap: [AppComponent],
    providers: [
    ]
})
export class AppModule { }
Add app.component.ts

import { Component, OnInit } from '@angular/core';

@Component({
    selector: 'no404-bo-app',
    template: `
        
`,
    providers: []
})
export class AppComponent implements OnInit {

    constructor() {
        console.log('AppComponent -> constructor');
    }

    ngOnInit() {
        console.log('AppComponent -> ngOnInit');
    }
}
Create the routing module (app-routing.module.ts)

import { NgModule } from '@angular/core';
import { Routes, RouterModule } from '@angular/router';
import { HomeComponent } from './home/home.component';

export const routes: Routes = [
    { path: '', redirectTo: 'home', pathMatch: 'full' },
    { path: 'home', component: HomeComponent }
];

@NgModule({
    imports: [RouterModule.forRoot(routes)],
    exports: [RouterModule]
})
export class AppRoutingModule { }
And add the home component

import { Component, OnInit } from '@angular/core';

@Component({
    selector: 'home',
    template: `
        

Home

Hello you !
`
}) export class HomeComponent implements OnInit { constructor() { console.log('HomeComponent -> constructor'); } ngOnInit() { console.log('HomeComponent -> ngOnInit'); } }
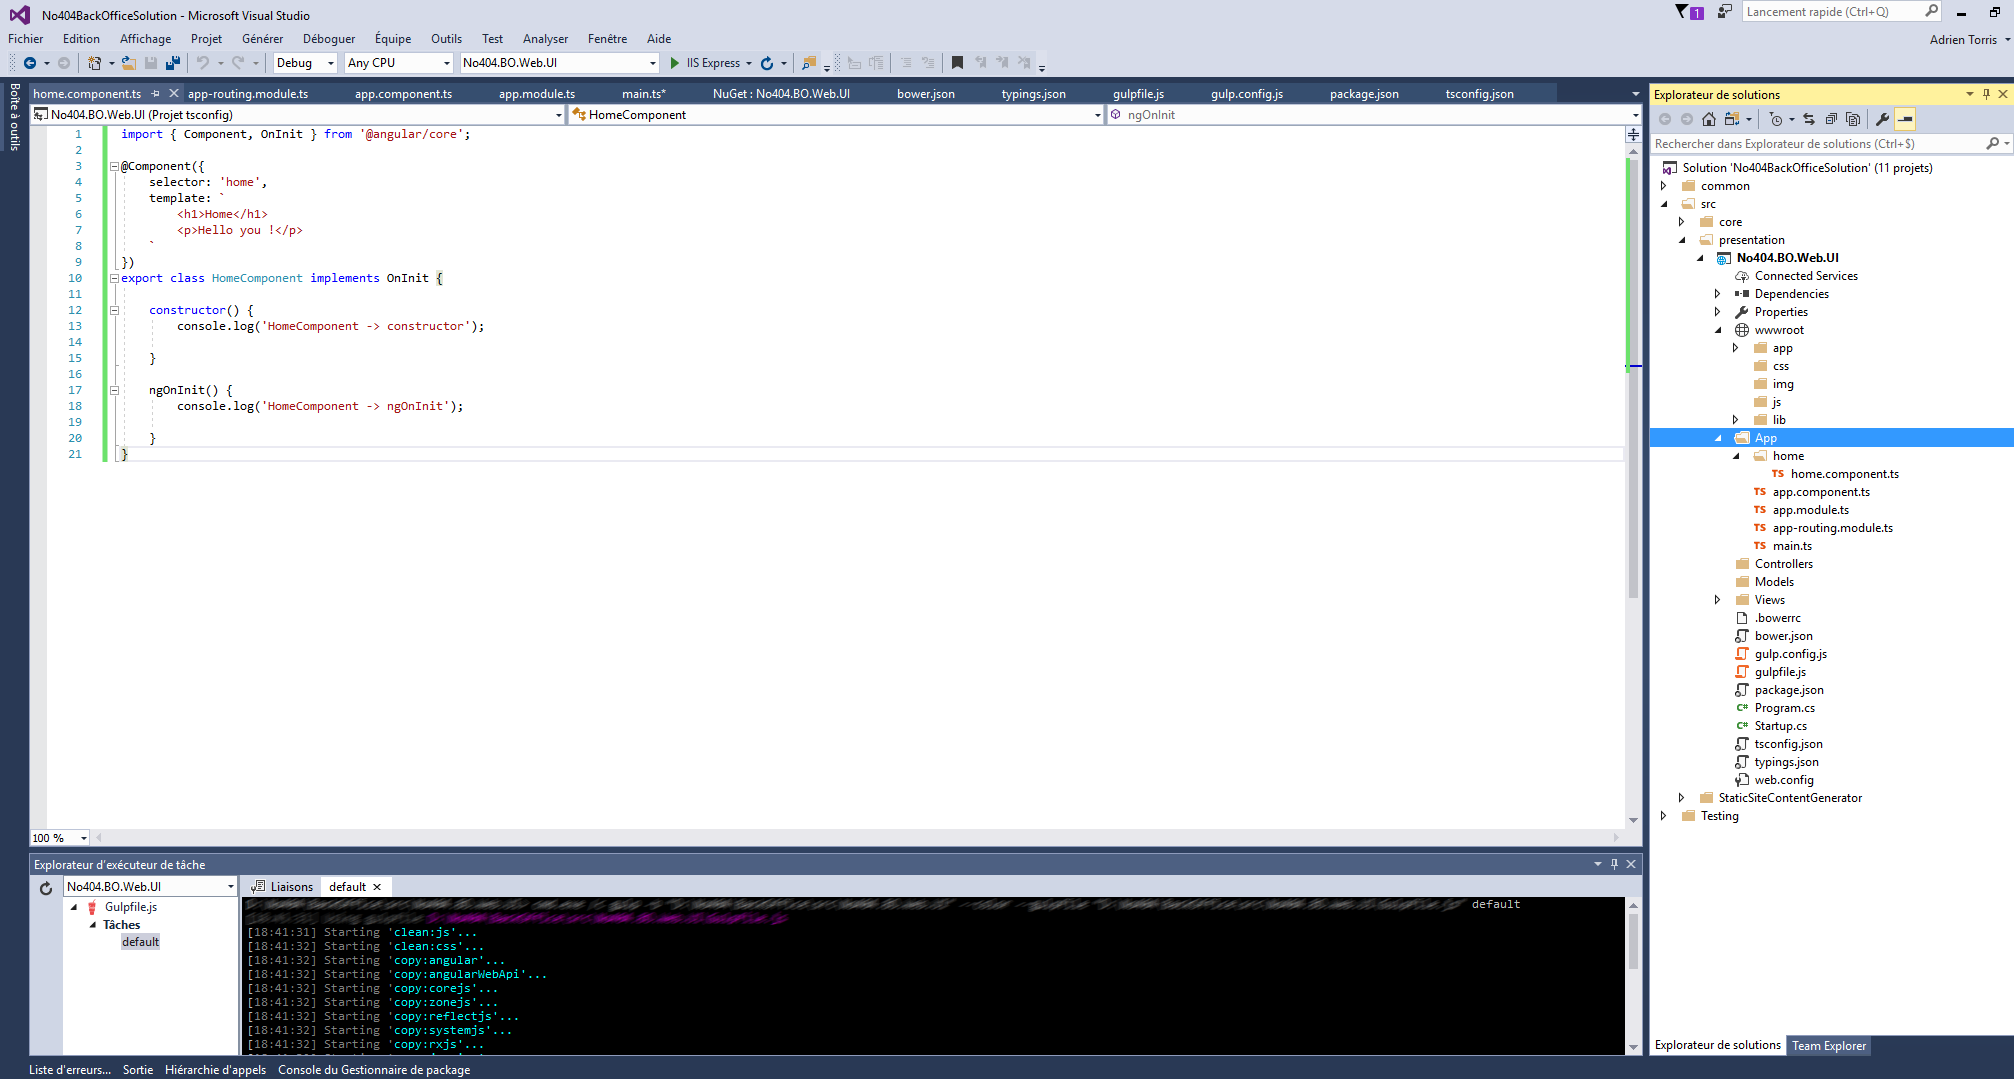
How to setup an Angular 2 and TypeScript project with Visual Studio 2017
If you build your solution, you can see that your outpout app folder has been populated with some javascript files generated by your TypeScript files.
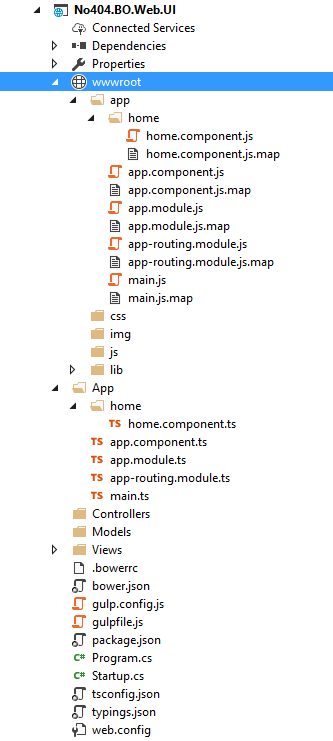
How to setup an Angular 2 and TypeScript project with Visual Studio 2017
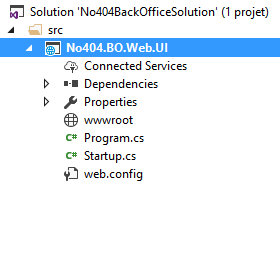
If you launch your website, you will have something like this :
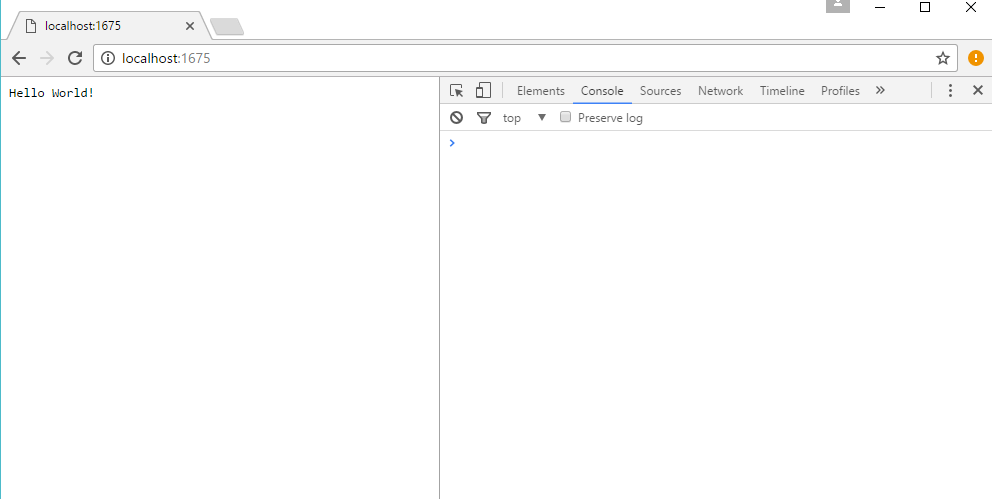
How to setup an Angular 2 and TypeScript project with Visual Studio 2017
No trace in the console and not the content in our typescript templates. Why ? Cause we have to tell our website startup that we want to load our typescript application.

Configure your web app to dispay your angular application

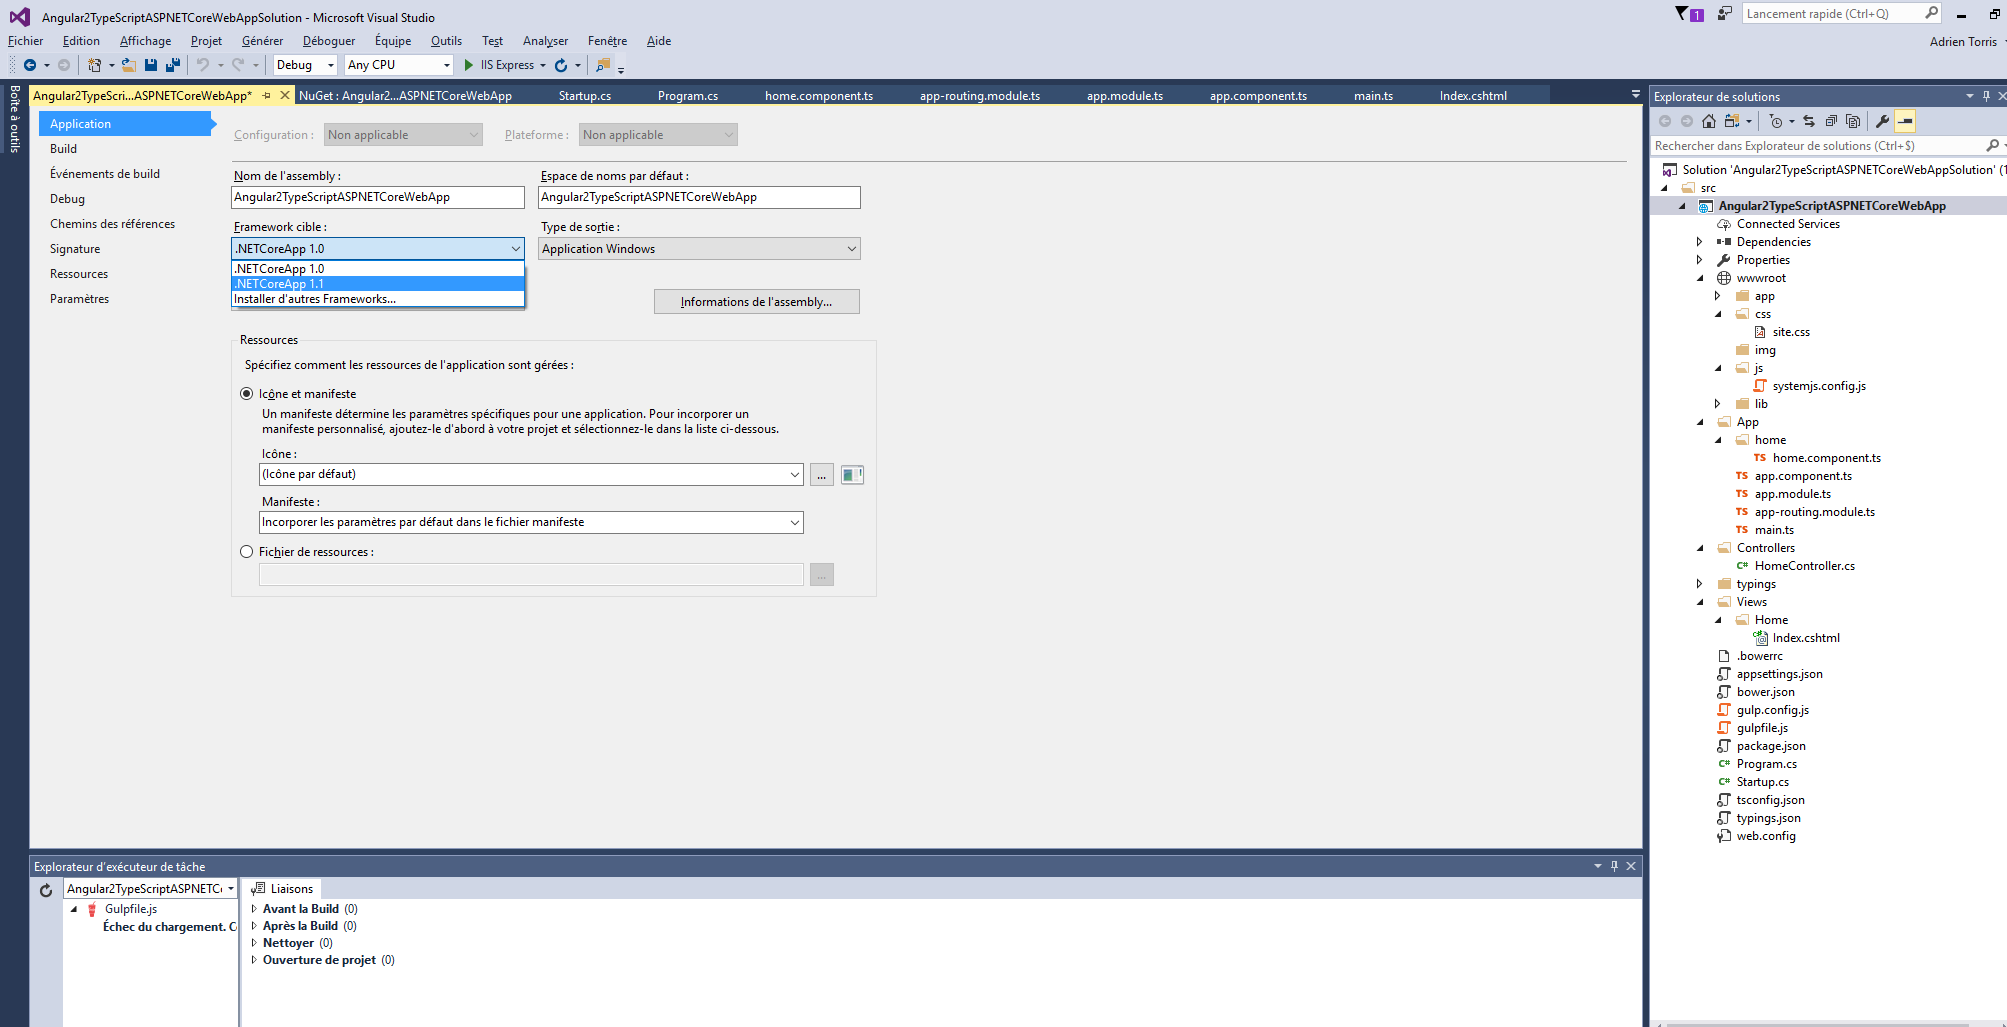
Check if your application is targeting the .NETCoreApp framework, version 1.1, if not update it.
How to setup an Angular 2 and TypeScript project with Visual Studio 2017
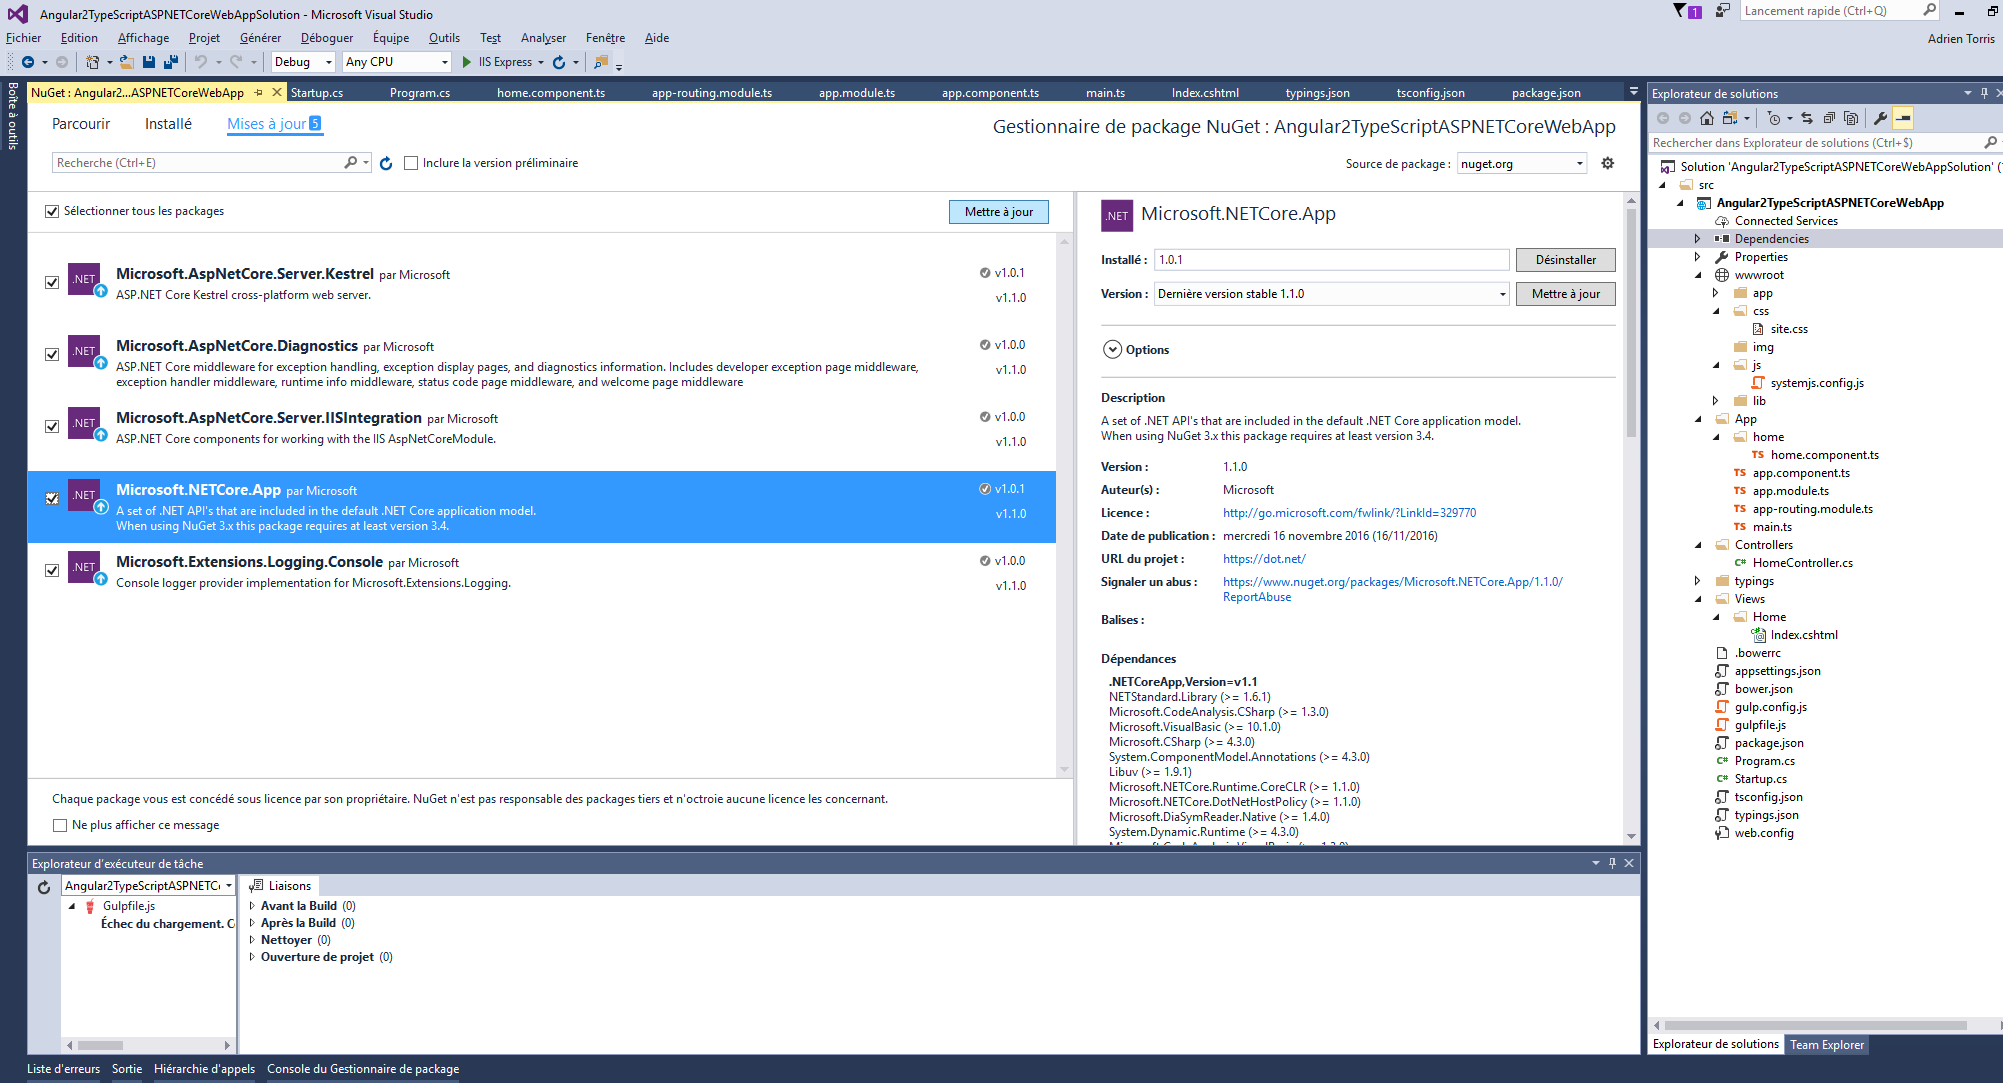
Check if the Nuget dependencies are targeting the last version, if not update them all.
How to setup an Angular 2 and TypeScript project with Visual Studio 2017
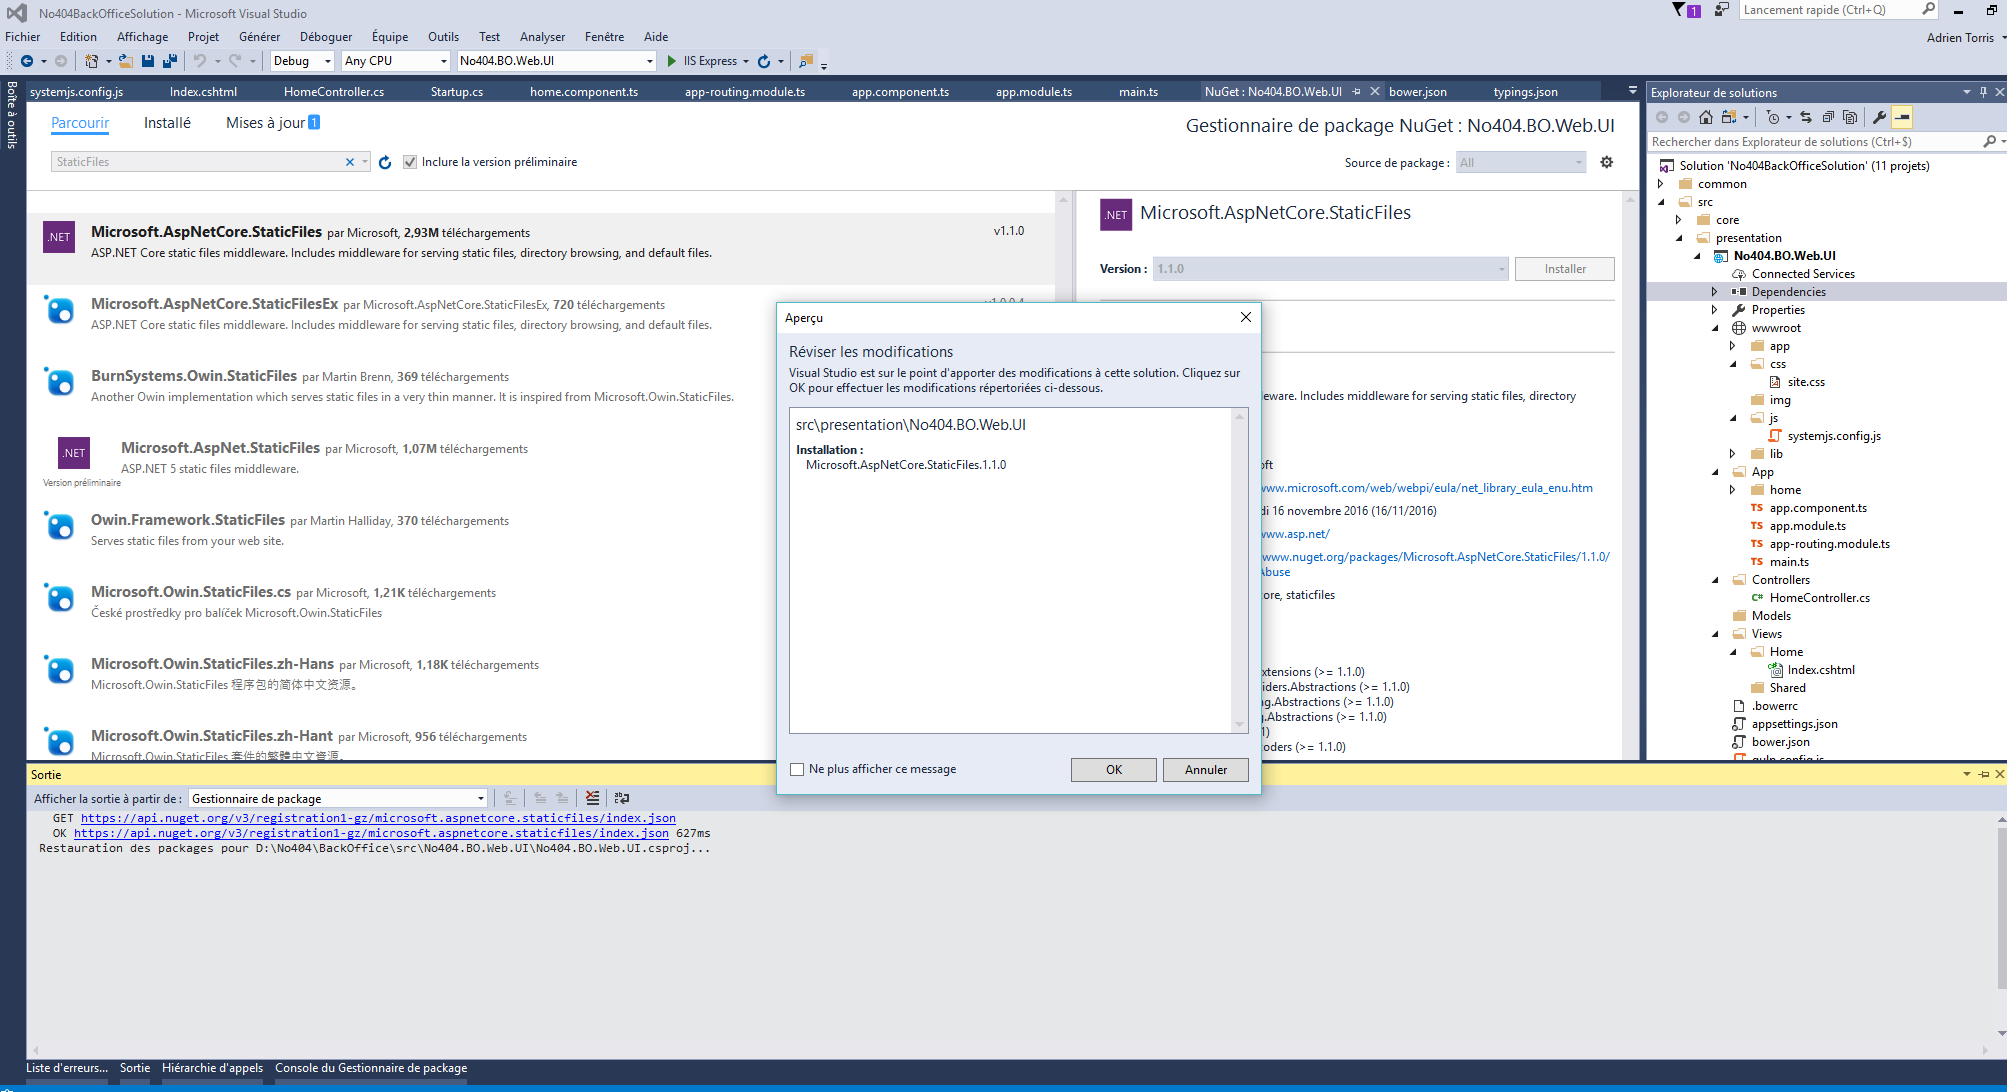
Add the Nuget dependencies you need :
  • Microsoft.AspNetCore.Mvc
  • Microsoft.AspNetCore.StaticFiles
  • Microsoft.Extensions.Logging.Debug
  • Microsoft.Extensions.Configuration.Json
Microsoft.AspNetCore.StaticFiles is a middleware for handling requests for file system resources including files and directories that enable your application to serve HTML and javascript files, indispensable elements of an Angular application.
For more information about Microsoft.AspNetCore.StaticFiles, you can see :
How to setup an Angular 2 and TypeScript project with Visual Studio 2017
Once you have added the Microsoft.AspNetCore.StaticFiles package, you have to enable your app to serve static files. It occurs in the Configure method in the startup class, using app.UseStaticFiles():.

public void ConfigureServices(IServiceCollection services)
{
    services
               .AddMvc()
               .AddJsonOptions(options => options.SerializerSettings.ContractResolver =
                   new DefaultContractResolver());
}

public void Configure(IApplicationBuilder app, IHostingEnvironment env, ILoggerFactory loggerFactory)
{
    loggerFactory.AddConsole(Configuration.GetSection("Logging"));
    loggerFactory.AddDebug();

    app.UseCors(
        builder => builder.AllowAnyOrigin()
            .AllowAnyHeader()
            .AllowAnyMethod()
            .AllowCredentials())
        .UseStaticFiles();

    app.UseMvc(routes =>
    {
        routes.MapRoute(
            name: "default",
            template: "{controller=Home}/{action=Index}/{id?}");
    });
}

Add the Home controller with the view

Add HomeController and Index.cshtml in the home folder of the Views.
Add systemjs.config.js javascript file in your js folder of the wwwroot folder.

(function (global) {
    System.config({
        paths: {
            'npm:': 'lib/'
        },
        map: {
            app: 'app',
            '@angular/core': 'npm:@angular/core/bundles/core.umd.js',
            '@angular/common': 'npm:@angular/common/bundles/common.umd.js',
            '@angular/compiler': 'npm:@angular/compiler/bundles/compiler.umd.js',
            '@angular/platform-browser': 'npm:@angular/platform-browser/bundles/platform-browser.umd.js',
            '@angular/platform-browser-dynamic': 'npm:@angular/platform-browser-dynamic/bundles/platform-browser-dynamic.umd.js',
            '@angular/http': 'npm:@angular/http/bundles/http.umd.js',
            '@angular/router': 'npm:@angular/router/bundles/router.umd.js',
            '@angular/forms': 'npm:@angular/forms/bundles/forms.umd.js',
            'rxjs': 'npm:rxjs',
            'angular-in-memory-web-api': 'npm:angular-in-memory-web-api/bundles/in-memory-web-api.umd.js'
        },
        packages: {
            app: {
                main: './main.js',
                defaultExtension: 'js'
            },
            rxjs: {
                defaultExtension: 'js'
            },
            'angular2-in-memory-web-api': {
                main: './index.js',
                defaultExtension: 'js'
            }
        }
    });
})(this);
Set up the content of your Index.cshtml view to load the ui dependencies your need, and load your Angular application.


<html>
<head>
    <base href="/">
    <meta charset="utf-8" />
    <meta name="viewport" content="width=device-width, initial-scale=1.0" />

    <link rel="stylesheet" href="~/lib/bootstrap/dist/css/bootstrap.css" />
    <link rel="stylesheet" href="~/css/site.css" />

    <script src="~/lib/jquery/dist/jquery.js"></script>
    <script src="~/lib/bootstrap/dist/js/bootstrap.js"></script>

    <script src="~/lib/core-js/client/shim.js"></script>
    <script src="~/lib/zone.js/dist/zone.js"></script>
    <script src="~/lib/reflect-metadata/Reflect.js"></script>
    <script src="~/lib/systemjs/dist/system.src.js"></script>

    <script src="~/js/systemjs.config.js"></script>
    <script>
      System.import('app').catch(function(err){ console.error(err); });
    </script>
</head>
<body>
    <div class="container">
        <no404-bo-app>Loading...</no404-bo-app>
    </div>
</body>
</html>

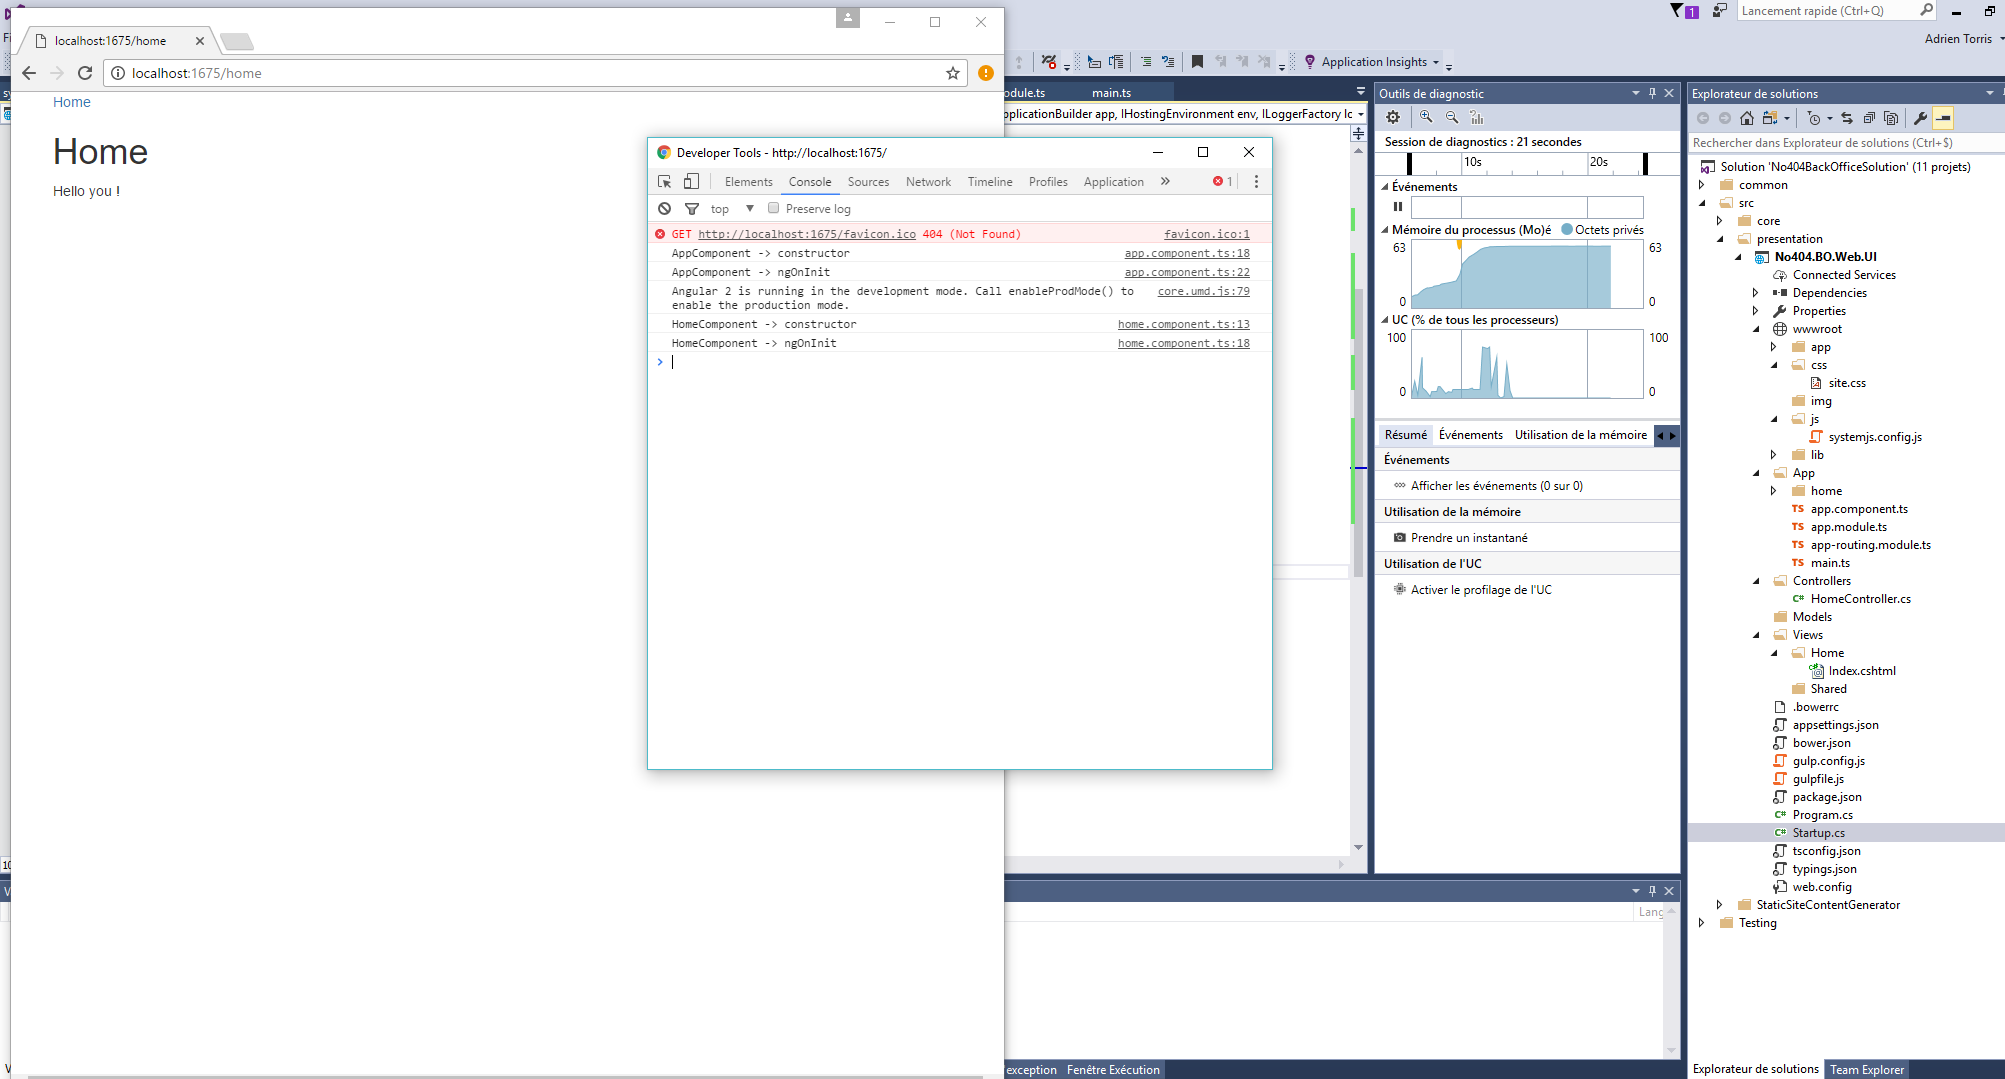
And it's work !

If you launch your application now, you can see that all is working and your Angular 2 application is correctly loaded.
How to setup an Angular 2 and TypeScript project with Visual Studio 2017
You can now implement your Angular 2 application to do what you have to do. Enjoy :)


PS: If you see a strange C folder appearing in your solution, follow this tutorial : Update ASP.NET Core web application to .NETCoreApp1.1 causes a project loading failure
How to setup an Angular 2 and TypeScript project with Visual Studio 2017
February 11, 2017
  • ASP.NET Core
  • Angular
  • Angular2
  • TypeScript
  • NPM
  • Node.js
  • MVC

Tuesday, July 18, 2017

0 - 60 with Angular 2 & Visual Studio - Part 2

Copyright from: blog.sstorie.com

I gave a talk on this topic for the AngularMN meetup in June, and to support that I created a new repository with the the recorded talk, the organized code and links to a couple references. Please check it out. Thanks!
Now back to the original article...
This is the second part of a two-part series on writing Angular 2 code with Visual Studio. In this part we're not going to dive into the Angular 2 code itself, but rather talk about what the experience of building it in Visual Studio is like, and some things to watch for. For reference, I'm using Visual Studio 2015 Update 2 and ASP.NET 4.5 (i.e., not the bleeding edge ASP.NET Core stuff).
In the first part we walked through building the back-end API, and structuring the app to support serving our Angular application. Let's continue now and explore what building the client-side of things is like.
Decisions to make
When using Visual Studio for any typescript-based project (be it Angular 2 or something else) you need to consider a couple things because Visual Studio can do a lot for you:
  • Do you want Visual Studio to manage your NPM packages?
  • Do you want to have Visual Studio compile your typescript for you? Or would you rather use something like webpack?
  • Do you want to use the built-in task runner to manage NPM tasks?
Personally, I think it's a hold-over from how Microsoft used to present VS as an all-in-one tool for development, but you'll need to think about the questions above. Let's take each of these one-by-one.
Managing NPM packages
Visual Studio 2015 has built-in support for package.json. This means it provides intelli-sense for all kinds of good stuff while editing the file:
When you make and save updates to the file VS will automatically start downloading the packages changed. This can be handy for very small projects, but I actually prefer to handle this myself using the console. I think it makes errors easier to see, and helps me understand what's happening.
Now, the pain of this is that you can't just tell VS to never restore npm packages automatically without disabling all npm related functionality (including the task runner integration discussed below). I've had experience with VS making my machine crawl because it kicked off many nodejs processes trying to keep the packages in sync with package.json. It seems to have gotten a little better with VS 2015 Update 2, but if you want to completely disable npm integration you can follow the guidance of this StackOverflow post.
Compiling typescript
By default VS will compile your typescript code automatically whenever you build the project the files are associated with. Depending on your environment, or if you have a simple "website" project, this could be a very useful thing. With something more complex like an Angular2 application this could be a waste of time. How typescript files are handled is controlled by the tsconfig.json file present in your folder structure (quick link to the complete schema).
My personal preference is to defer the compilation of typescript files to something like webpack so I can do more advanced processing. In that case I usually update tsconfig.json to include the following:
{
  ...other stuff...
  "compileOnSave": false,
}
Now even with this you'll still find that Visual Studio will compile the typescript files when you build the project, so update that we need to do a more invasive change. What we need to do is update the .csproj file to include a tag that tells Visual Studio to not compile typescript files at all. To make this update we first unload the project from the solution like so:
animated gif showing how to unload the project
...and once that's done we can edit the raw file and add the following tag to the first property group:
    <TypeScriptCompileBlocked>true</TypeScriptCompileBlocked>
Once you've done that VS will completely ignore the ts files when you build the project. So add that tag, save the .csproj file, and you can reload the project:
animated gif showing the reload
How to execute NPM tasks
I think in the years after Visual Studio 2013 was released Microsoft was playing catch-up with the explosion of automated javascript build pipelines using Grunt and Gulp. Mads Kristensen (of Microsoft) came up with a solution, and built something called the Task Runner Extension that would automatically detect the respective config files and let you run tasks from the GUI. Here's an example of how it looks with a grunt file:
This extension brought the experience of managing these task runners a little closer to home for VS users, but it also let you integrate the tasks into the build pipeline of VS itself. So for example, you could say that a specific gulp task should run when I build the entire .NET project. Useful stuff.
Now, Mads is a seriously prolific developer, and he eventually added the ability to manage NPM tasks within the Task Runner as well. Here's an example shot of running an npm build task within VS:
Now, that said there is one big gotcha you need to be careful of. VS ships with a specific version of node it will use when running tasks by default. If you happen to install a newer version on your system, and install packages using it, then some of the npm commands may not work. For example, I'm using node-sass in this code but by default it's not working right when I build via the task runner:
To fix this we need to tell VS that we've got a newer version of Node it should use (there's Mads yet again!). We can do this pretty easily using VS's option dialog:
So what do I do?
I personally like to manage these items myself from the command line. I'll fire up ConEmu and run my npm tasks on a different monitor so they're out of the way. But it's important to understand what options you have should you prefer something else.
Writing Angular 2 code
Okay, with these decisions made we can actually start writing some Angular 2 code. I won't spend a lot of time elaborating the code here because it's pretty standard, and has nothing specific to Visual Studio. However, I will highlight how you might consider structuring your application to take advantage of what VS has to offer.
What we're going to build is a simple app to query the API we built in the previous post. We can enter the zip code we're interested in, and once the API call is complete we are presented with a simple chart showing the historical temperatures. It looks like this:
So, nothing crazy, but arguably somewhat useful...maybe :) Now I'm not saying this Angular code is amazing...in fact it's not, but you can see all of it in my github repo:
Considerations to make
VS has solid typescript support right out of the box, but there are some things to be aware of while building Angular 2 apps. Here's a list I have run into:
  • The importance of tsconfig.json
  • Whether to use inline templates/CSS or use external files for your components
  • How to approach editing files while debugging the website within VS
  • Using webpack to create easy bundles to serve with Nancy
Let's take each of these in turn.
The importance of tsconfig.json
As I said earlier, VS uses this file to know how to process the typescript files it finds. For example, it's absolutely critical that you include the following lines in your tsconfig.json, otherwise your Angular 2 code will compile, but likely fail when running in a browser:
In the image above you can also see I'm specifying the files I want this config file to apply to. By including the root file of my project (i.e., the one that ultimately imports all the others) I can apply this config to how VS treats all my project's files. So for example, if I start editing a new service, that has yet to be imported by a file in my project, VS will throw errors like this:
This is because I haven't told VS how to treat this specific typescript file. Once I import this service into a file that is already managed by the config, then the error goes away. If you're not aware of this, then it might seem really confusing why a bunch of errors are thrown when you create new Angular 2 components.
Of course, you can update tsconfig.json to include all typescript files too, but that depends on your specific application.
Whether to inline templates/CSS or use external files
With Angular 2 you can either include the template for a component as a string right in the component's file itself, or refer to an external html file. I'm a little torn on this one actually because I really like having the HTML right in the same file, but first-class support for that just isn't in the editors yet...VS included. However, if you are okay with moving the HTML to an external file, then you can use the great built in support for editing HTML files.
The same thing applies to your component styles. Angular 2 provides some really awesome ways to scope your CSS to a specific component through View Encapsulation. If you haven't seen it yet, check out Justin Schwartzenberger's great talk at ng-conf 2016. However, out of the box this requires you to write your CSS right in the component file...preventing the use of tools like sass and postcss. With some webpack loaders however, you can move these styles to an external file and still include them. This means you can use the support VS has for CSS and sass files (including intelli-sense):
Editing files while debugging the site
In this example application you can run the project, which will start up IISExpress to host the site and allow us to break into the server-side code. So we can set a breakpoint within our API, and still use a browser to debug the client side. If you're running something like webpack --watch in a console, then you can even edit your html and typescript files while the solution is running.
The problem with VS though is that once you're running the application VS will allow you to add some types of files, but no new folders, and once you add a file you can't delete it.
So while you're actively developing the project this can be frustrating. If I'm creating new components I'll usually try to create the folder structures and empty files in advanced of a debugging session so I get around this.
Using webpack to create bundles
This isn't really too specific to VS, but I just wanted to call out that webpack is a great tool for creating a complete bundle for your app that can be easily served by something like Nancy. The reason I don't use much of the built-in support VS offers for typescript is because webpack is so much more powerful. There are insanely complicated webpack files out there, but you really don't need much to do some powerful things:
var autoprefixer = require("autoprefixer");

module.exports = {  
    // Define the entry points for our application so webpack knows what to 
    //  use as inputs
    //
    entry: {
        app: ["./App/main"]
    },

    // Define where the resulting file should go
    //
    output: {
        filename: "content/[name].bundle.js"
    },

    resolve: {
        extensions: ["", ".webpack.js", ".web.js", ".ts", ".tsx", ".js"]
    },

    // Turn on source maps for all applicable files.
    //
    devtool: "source-map",

    module: {
        loaders: [
            // Process any typescript or typescript-jsx files using the ts-loader
            //
            {
                test: /\.tsx?$/,
                loaders: ["ts-loader"]
            },

            // Process Sass files using the sass-loader first, and then with the 
            //  raw-loader so we can inject them into the 'styles' property of
            //  components (to take advantage of view encapsulation)
            //
            {
                test: /\.scss$/,
                exclude: /node_modules/,
                loaders: ['raw-loader', 'postcss-loader', 'sass-loader'] // sass-loader not scss-loader
            },

            // Load any HTML files into raw strings so they can be included with
            //  the angular components in-line
            //
            {
                test: /\.html$/,
                loaders: ['html-loader']
            }
        ]
    },
    postcss: function () {
        return [autoprefixer];
    }
}
Wrapping up
So in this post I didn't go through the specifics of the Angular 2 code, but I explained some of the things you might encounter when building Angular 2 apps with Visual Studio. It's an amazingly powerful IDE, and if you're a .NET dev don't think you can't build Angular 2 apps with the tools you know.
All of the code for this example is available in my github repo.
Thanks for reading!