Copyright from: solution-patching-in-microsoft-dynamics-crm-2016
Introduction
Patches

Keep your eye on the Version number of the solution as this is one of the critical thing which will come to notice as we move ahead.
Now suppose due to some requirement changes I have to increase the maximum length for “First Name” field of Contact from 155 to 175.
Since this field was a part of the earlier solution that we had and this is the only change we need to make to that solution, we will go ahead and create a patch for the original solution
Use the “Clone a Patch” button added to the solutions views

Notice the other buttons as well “Clone Solution” and “Apply Solution Upgrade”, this completes the entire solution management architechture.
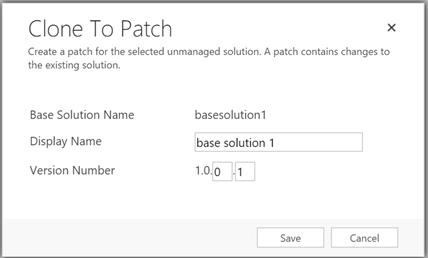
It is a good practice to increment the version number for a proper version management of the solution. Since this is a patch it only allows you to modify the last 2 digits in the version.
This creates the following new solution.

Add only the Contact “First Name” field to the solution and update the length as shown below.
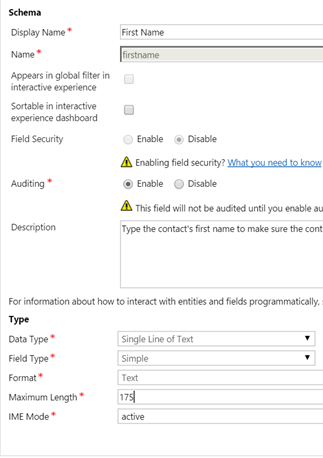
When you import this patch on the client environment this solution will be applied on top of the base solution and only the “firstname” field will be updated.

You can create multiple patches for a solution. To create another patch you would select the original solution and click “Clone a Patch”.

The original solution can no longer be modified.

In the Target system, you can delete the managed solution of a patch without affecting the base solution installed there.
The patches don’t have a dependency on each other, so in the target system I deleted the first patch that was imported and then imported the second patch and it works just fine. So that’s huge plus, since one of the problems with earlier solution management architecture was the dependencies that would be created between managed solutions. So here there is no dependency of the patches amongst them. But of course they do need the base solution present since they are patch for the base solution.

Uninstalling the base solution on the target also automatically uninstalls all the patches that were installed for the base solution.
When you want to plan your next version of the solution, you usually want to rollup all of the patches that were released for the base solution into the new solution, before you can add new changes in there. This can be done using the “Clone Solution” button.
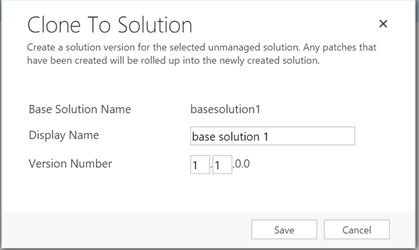
Now this time, you are only allowed to change the major and minor parts of the version.
Once the operation completes, you will find the patches deleted and the base solution version updated.

This solution is now available for editing as well.
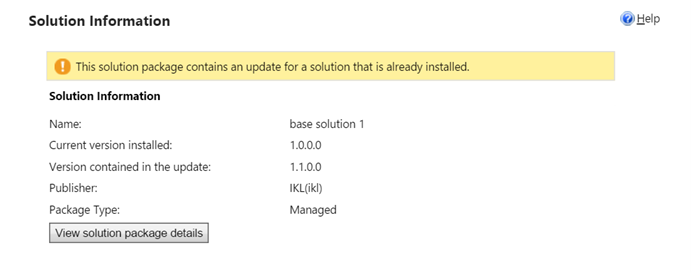
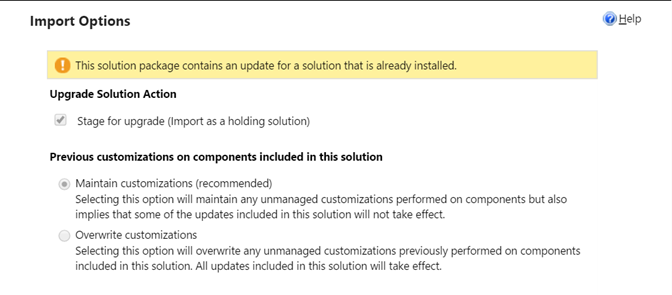
When the Upgrade solution is imported on the target system, it auto detects this to be an upgrade to an existing installed package and notifies you of the same.
On the next step of the import wizard, you get the option to choose if you want this imported as “Holding Solution”. This option will show up and checked by default if the target organization has base solution and patches for base solution installed. You can learn more about the “Holding Solution” concept here
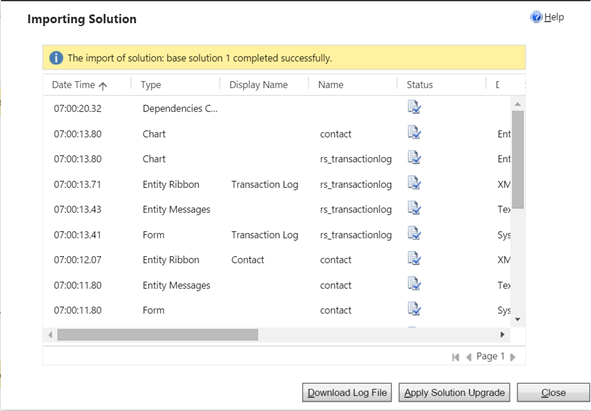
When the solution import completes, you see a new option “Apply Solution Upgrade” since you chose to import this as a holding solution.
If you do not choose to apply the solution upgrade, you will see three solutions in the target system.

Now choose the original Base solution on the target system and click on the “Apply Solution Upgrade” button to keep a single solution for the package instead of the three that appear now

If there were no patches installed in the target system and the “Stage for Upgrade” option is unchecked, you have the option to check it if you want. If you leave it unchecked it simply updates the solution and you do not need to “Apply Solution Upgrade”.
Note : We have explained all the above scenarios using Managed Solution. When we tried with Unmanaged solution we got error “Action could not be taken for few records before of status reason transition restrictions” while importing Unmanaged Solution patch. But we were able to successfully import the cloned Unmanaged Solution for the same.
Conclusion
Though I have only explored this using
basic customizations to entities, the whole solution management
framework from creating a solution to patching to moving it to the next
release and similarly “upgrading solution” on the target system appears
that, it would reduce if not end a lot of “solution import” woes of the
ISV community.
You may also like to read : User Adoption Metrics that matter in your Dynamics CRM.
Introduction
In our earlier blog we looked into the enhancements made to the way solutions can be created in Microsoft Dynamics CRM 2016. Now moving forward we will look at a common scenario of sending out Patches for your solution. Often it happens that you may need to update a few components of your managed solution and ideally would like to have a way to only have those shipped and then have a way to compile all of these patches in the next release of the solution. This helps with better versioning control and management of the solution assets.
Patches
Taking it forward from our previous article, here is what our solution looked like.

Keep your eye on the Version number of the solution as this is one of the critical thing which will come to notice as we move ahead.
Now suppose due to some requirement changes I have to increase the maximum length for “First Name” field of Contact from 155 to 175.
Since this field was a part of the earlier solution that we had and this is the only change we need to make to that solution, we will go ahead and create a patch for the original solution
Use the “Clone a Patch” button added to the solutions views

Notice the other buttons as well “Clone Solution” and “Apply Solution Upgrade”, this completes the entire solution management architechture.

It is a good practice to increment the version number for a proper version management of the solution. Since this is a patch it only allows you to modify the last 2 digits in the version.
This creates the following new solution.

Add only the Contact “First Name” field to the solution and update the length as shown below.

When you import this patch on the client environment this solution will be applied on top of the base solution and only the “firstname” field will be updated.

You can create multiple patches for a solution. To create another patch you would select the original solution and click “Clone a Patch”.

The original solution can no longer be modified.

In the Target system, you can delete the managed solution of a patch without affecting the base solution installed there.
The patches don’t have a dependency on each other, so in the target system I deleted the first patch that was imported and then imported the second patch and it works just fine. So that’s huge plus, since one of the problems with earlier solution management architecture was the dependencies that would be created between managed solutions. So here there is no dependency of the patches amongst them. But of course they do need the base solution present since they are patch for the base solution.

Uninstalling the base solution on the target also automatically uninstalls all the patches that were installed for the base solution.
When you want to plan your next version of the solution, you usually want to rollup all of the patches that were released for the base solution into the new solution, before you can add new changes in there. This can be done using the “Clone Solution” button.

Now this time, you are only allowed to change the major and minor parts of the version.
Once the operation completes, you will find the patches deleted and the base solution version updated.

This solution is now available for editing as well.
When the Upgrade solution is imported on the target system, it auto detects this to be an upgrade to an existing installed package and notifies you of the same.

On the next step of the import wizard, you get the option to choose if you want this imported as “Holding Solution”. This option will show up and checked by default if the target organization has base solution and patches for base solution installed. You can learn more about the “Holding Solution” concept here

When the solution import completes, you see a new option “Apply Solution Upgrade” since you chose to import this as a holding solution.

If you do not choose to apply the solution upgrade, you will see three solutions in the target system.

Now choose the original Base solution on the target system and click on the “Apply Solution Upgrade” button to keep a single solution for the package instead of the three that appear now
If there were no patches installed in the target system and the “Stage for Upgrade” option is unchecked, you have the option to check it if you want. If you leave it unchecked it simply updates the solution and you do not need to “Apply Solution Upgrade”.
Note : We have explained all the above scenarios using Managed Solution. When we tried with Unmanaged solution we got error “Action could not be taken for few records before of status reason transition restrictions” while importing Unmanaged Solution patch. But we were able to successfully import the cloned Unmanaged Solution for the same.
Conclusion
Though I have only explored this using
basic customizations to entities, the whole solution management
framework from creating a solution to patching to moving it to the next
release and similarly “upgrading solution” on the target system appears
that, it would reduce if not end a lot of “solution import” woes of the
ISV community.You may also like to read : User Adoption Metrics that matter in your Dynamics CRM.
No comments:
Post a Comment