The
concept of Single Page Web Applications is great for building modern
web-based applications. However as more and more applications are being
transferred into the browser the complexity and the amount of data which
needs to be managed is consistently growing.
Many
modern web frameworks, like Angular, are using a component-based
approach to divide the application into smaller units. This approach is
great because using components helps to better structure your project,
keep the overview and make code reusable.
Implementing
a component in Angular 4 means that the component is also managing it’s
own state (it’s own data). E.g. if a component wants to display data
from a service, corresponding service methods are called and the
returned data is stored in properties of the component class. In the
component template you can then access and embed those properties, so
that the property values are displayed in the HTML output.
As
the complexity of your application is increasing you’ll be using more
and more components and data which must be shared across components is
passed down the component tree, so that the state of every component is
always updated with the relevant data.
This
approach is feasible if you’re working with just a very few components.
However, if the number of components in your application is increasing
this way of managing state becomes cumbersome and error-prone.
The shortcomings are as follows:
Usage
of input properties for passing data down the component tree: In order
to pass from one component to another, we’ve to use input properties to
pass data down the component tree. This means that data needs to be
passed to components in between as well. These components do not make
use of this data, so this approach is inefficient.
Defining
lots of input properties to pass data between components, makes
components inflexible. Because components rely on those input
properties, they cannot be reused somewhere else.
If the state is changed within one component you need to notify all other components which makes use of the same data manually.
All
these shortcomings can lead to a complex application architecture and
lead to inconsistent state information accross your components.
To
solve that problem we need to establish a new way of managing state in
our application. This is where Redux comes in. Redux is a predictable
state container for JavaScript apps which makes it possible to use a
centralized state management in your application. So what exactly is
meant by state and centralized state management? Simply, you can think
of state as just data you use in your application. So a centralized
state is just data you’re using by more than one component (application
level state).
In
the following you’ll get an overview of Redux building blocks and learn
to apply Redux in your Angular application by building a sample
application step-by-step.
Building Blocks of Redux
The Redux website can be found at http://redux.js.org/.
Redux can be used with any modern JavaScript-based web frameworks.
Before starting to build our Angular Redux sample application let’s
first clarify the core concept of Redux.
Redux
organizes your application state in the store, a single data structure
in your application. The components of your application read the state
of the application from the store. The store is never mutated directly.
Instead a action is dispatched to a reducer function. The reducer
function creates a new application state by combining the old state and
the mutations defined by the action.
Let’s explore the building blocks of Redux one by one:
Store
The
store is a single JS object. To create a store you simple need to a add
a TypeScript file to the project and declare a new interface type which
contains all the properties you’d like to keep in the store.
Actions
Actions are plain JS objects that represent something that has happened. Can be compared to events.
Reducers
A reducer is a function that specifies how the state changes in response to an action.
What’s
important to understand is the fact that a reducer function does not
modify the state. It always returns a new state object with the
modifications included.
A
reducer function must always be a pure function. That means that the
function must ensure that if the same input is given always the same
output is produced.
E.g. take a look at the following reducer function which takes the old state and increments the state property count.
Now that you have a basic understanding of Redux, let’s start with the second part of this tutorial and create a new Angular 4 application with Redux from scratch.
To initiate a new Angular 4 project we can use Angular CLI:
$ ng new angularedux-todo
This creates a new folder angularredux-todo and within that folder you can find the initial Angular starter project. The live-reloading development web server is started by using the following command in this directory:
$ ng serve
Installation Redux for Angular
Next we need to add Redux to our project. There are many Angular specific implementations of Redux available. For the following demo we’ll use the NPM package:
@angular-redux/store
@angular-redux/store relies on the redux package itself, so we need to install both packages
$ npm install redux @angular-redux/store —save
What We’re Going To Build
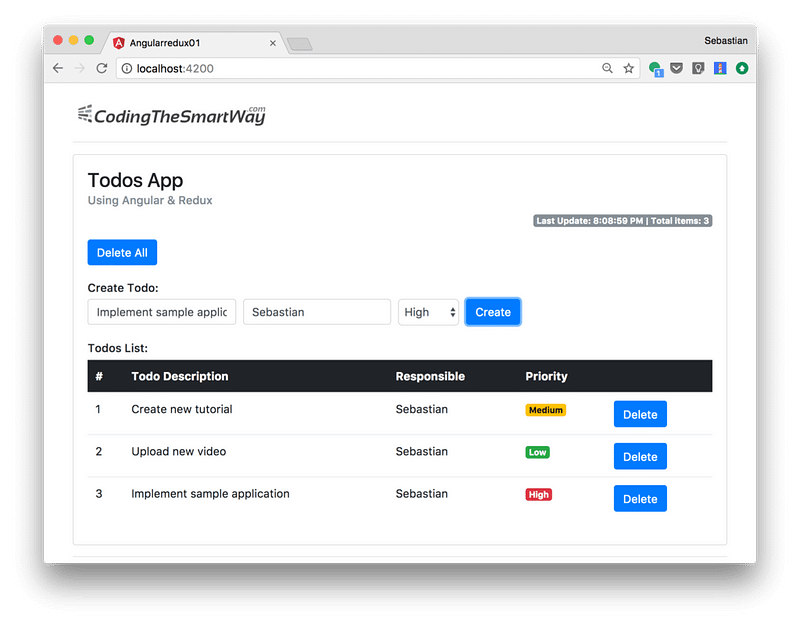
Let’s take a look at the application we’re going to build in the next steps:
The application we’re going to build is a simple Todo manager application. The application will consists of two Components:
Todo-Overview: This component contains status information like last update and total items. Furthermore this components contains the button “Delete all” to clear to list of todos.
Todo-List: The todo-list component contains the input form elements to enter a new todo and the table output of all todo elements.
The todo items will be managed centrally by a Redux store, so that both components must interact with this store to access and manage the todo data.
Implementing Store, Actions and Reducer
Now, let’s implemented a basic store and a basic reducer function by creating the file store.ts in the project folder src/app and insert the following piece of code.
export interface IAppState {
}
export function rootReducer(state, action) {
    return state;
}
The store is implemented by introducing the IAppState interface type. In this first step the interface is empty so the store does not have any properties. The reducer function is called rootReducer. As every reducer function rootReducer takes two parameters: state and action. The state is the previous state of the application and action is an object describing the change which has been dispatched. At the moment the rootReducer is simply returning the original state, so no changes are made.
Now let’s add the properties to the IAppState interface:
todos as an array of type ITodo to contain all of our todo items
lastUpdate as Date type to contain the information when the todos array has been updated
At the same time we’re defining the INITIAL_STATE object of type IAppState. INITIAL_STATE is implementing the interface IAppState and initializing the properties todos with an empty array and lastUpdate with null. INITIAL_STATE will be used later on, when setting up the store of our application.
Next we need to implement the ITodo interface. Create the new file src/app/todo.ts and insert the following implementation:
Now let’s activate the store for our application. First add the following import statement to the top of app.module.ts:
import { NgRedux, NgReduxModule } from '@angular-redux/store';
Next, add NgReduxModule to the imports array of @NgModule as well.
We need to add one further import statement to import IAppState, rootReducer and INITIAL_STATE from store.ts:
import { IAppState, rootReducer, INITIAL_STATE } from './store';
The activation of the store is done by adding a constructor to the AppModule class, injecting NgRedux into that constructor and then calling the configureStore method of the NgRedux service:
The configureStore method takes two parameter. As the first parameter we’re passing in our reducer function rootReducer. The second parameter is an object containing the initial state of the store. In our case we’ve defined INITIAL_STATE already so that we can pass in that object here.
Defining Action Types
The reducer function should be able to handle all action types which are used in our application. Each action type is identified by a string. Create a new file src/app/actions.ts and define the following four action types:
Having defined action type constants makes it easier to deal with action types in the reducer function. In store.ts add the following import statement first:
import { ADD_TODO, TOGGLE_TODO, REMOVE_TODO, REMOVE_ALL_TODOS } from './actions';
Finish the implementation of the the reducer function in store.ts and make use of the action types as you can see in the following:
export function rootReducer(state: IAppState, action): IAppState {
    switch (action.type) {
        case ADD_TODO:
            action.todo.id = state.todos.length + 1;
            return Object.assign({}, state, {
                todos: state.todos.concat(Object.assign({}, action.todo)),
                lastUpdate: new Date()
            })

        case TOGGLE_TODO:
            var todo = state.todos.find(t => t.id === action.id);
            var index = state.todos.indexOf(todo);
            return Object.assign({}, state, {
                todos: [
                    ...state.todos.slice(0, index),
                    Object.assign({}, todo, {isCompleted: !todo.isCompleted}),
                    ...state.todos.slice(index+1)
                ],
                lastUpdate: new Date()
            })
        case REMOVE_TODO:
            return Object.assign({}, state, {
                todos: state.todos.filter(t => t.id !== action.id),
                lastUpdate: new Date()
            })
        case REMOVE_ALL_TODOS:
            return Object.assign({}, state, {
                todos: [],
                lastUpdate: new Date()
            })
    }
    return state;
}
Let’s explore the reducer function step by step.
First you may notice that a switch statement has been added for action.type. Action type contains the action string, so that the case statements can make use of the previously defined action constants:
ADD_TODO: The ADD_TODO case uses the new todo object which is available in action.todo and creates a new state object in which the todos array is extended with that new todo element. To create a new state object the Object.assign method is used.
TOGGLE_TODO: The TOGGLE_TODO action is dispatched if the user wants to complete / uncomplete a todo entry. In that case the isCompleted property of the current todo element must be changed to the opposite. This means that a new state objects needs to be created and returned which contains this new value. The Object.assign method is used once again to compile this new state object.
REMOVE_TODO: With REMOVE_TODO an action is handled which is returning a new state where a specific todo entry has been removed from the previous state’s todos array.
REMOVE_ALL_TODOS: This actions returns a new state objects where the todos property is set to an empty array, so that all todo items are removed from the application state.
Implementing TodoOverviewComponent
Now that our application has implemented all relevant Redux building blocks we’re ready to implement the TodoOverviewComponent and the TodoListComponent. First let’s start with the Todo-Overview component. Use the following Angular CLI command to add that new component to the project:
$ ng g component todo-overview
The four new files are added to src/app/todo-overview:
todo-overview.component.css
todo-overview.component.html
todo-overview.component.spec.ts
todo-overview.component.ts
Open up file todo-overview.component.ts and change the default implementation to:
We’re adding a few import statements on top of the file. NgRedux and select is imported from the @angular-redux/store package. IAppState is imported from store.ts and the action type REMOVE_ALL_TODOS is imported from actions.ts.
Using dependency injection again the NgRedux service is injected into the class. The clearTodos method is implemented to dispatch the REMOVE_ALL_TODOS action type to the store. Dispatching is done by using the dispatch method of the NgRedux service.
Furthermore we need to access the state properties todos and lastUpdate. To define class properties which gives you access to the store properties we need to use the @select decorator.
Now we’re ready to implement the corresponding template in todo-overview.component.html:
Last Update: {{ (lastUpdate | async) | date:'mediumTime' }} | Total items: {{ (todos | async).length }}
Please note, that you need to use the async pipe to include store properties as an expression statement in your template code.
Implementing TodoListComponent
Our second component is the TodosListComponent and is added to the project by using the following command:
$ ng g component todo-list
As we need to implement the todo entry form as part of this component we need to add the Angular FormsModule to our application. Add the following import statement to file app.module.ts:
import { FormsModule } from '@angular/forms';
Add the FormsModule to the imports array as well.
Next, let’s change the default implementation of the component class in todos-list.component.ts to what you can see in the following code listing:
Here again the NgRedux service is injected in the class constructor, so that we’re able to dispatch actions to the store. The @select decorator is used to gain access to the todos properties from the store. todos is later used in the template code to output all todo items as a table.
Furthermore we’re defining a class member of type ITodo called model. This model object will be used to implement the todo form in the template and bind values of the input controls to the properties of this object.
The event handler methods onSubmit(), toggleTodo() and removeTodo() are implemented to dispatch the corresponding actions to the store.
Now let’s take a look at the template implementation in file todo-list.component.html:
Create Todo:
Todos List:
#
Todo Description
Responsible
Priority
{{ t.id }}
{{ t.description }}
{{ t.responsible }}
LowMediumHigh
This template contains the implementation of an Angular template-driven form which lets the user input new todo items. The form submit event is connected to the onSubmit event handler method, so that the ADD_TODO action type is dispatched to the store whenever a user submits the form.
The table output of the todos array is done by using the NgFor directive in the following form:
Again, it’s important to use the async pipe again to retrieve data from the store for usage in the template.
To complete a todo item in the table the user should be able to simply click on the element (either on ID, description or responsible). Because of that we’re connecting the toggleTodo event handler method with the click event of the elements which contains the text information in the table.
Finally the user should be able to delete a single todo item from the list. To do so a button is included for each row and the click event of that button is connected to the removeTodo event handler method.
Last but not least you can find the CSS code for class completed in the following listing. This code needs to be inserted into file todo-list.component.css:
.completed {
    text-decoration: line-through;
  }
By adding the following attribute to the elements which contains the text values of a todo item we’re applying that class only of the isCompleted property is set.
[class.completed]="t.isCompleted"
In that case the text is crossed out, so that the user can see that this item is completed.
Implementing AppComponent:
Finally we need to include both components in AppComponent by using the elements and .

No comments:
Post a Comment