Tuesday, July 20, 2010

A Quicker Way to Create Custom SharePoint List Templates

Ever tried to create a custom list template for a SharePoint 3.0-based site? Something you thought was likely to be not such a big task quickly turned in to a nightmare of XML and GUIDs, right? Creating custom list templates is not a trivial task... nor is it a terribly good story. It's pretty darn complicated and can be quite an undertaking. In fact, last year when Rob Bogue, Paul Andrew and I were coming up with the content ideas and reviewing the labs/webcasts for the Introduction to SharePoint for ASP.NET Developers campaign, one thing Rob and I were adamant about was zero coverage of list definitions/templates and site definitions/templates. Why? The goal was to bring ASP2 developers to the platform... not send them running away! These things are nasty and scary… avoid them at all costs… unless if you simplify things…
Most people I know stay away from list definitions... and I did for a while. But now I’m not so scared of them… I came up with an approach that simplifies things. My approach to building them really makes things simpler and easier. This follows the same theme I have for site definitions which I blogged about earlier last year. My take on site definitions can be boiled down to the following:
  • Copy Blank Site and give it a new name/ID... this is just a shell... nothing special in it (I like to remove the WSS 3.0 logo from the default page so it really is a Blank Site, not a Not So Blank Site).
  • Create Features and associated stapling Features, stapling to the new site def.
  • Now you have a site def you can change after creating sites with it (by activating/deactivating stapling Features) and it's easier to build in a modular fashion.
The point of this post is demonstrate how to create list definitions quickly without much hassle. Scared of schema.xml? Don't be... just ignore 95% of it! A few quick edits taking less than 2 minutes and you're good! OK... here it goes...
  1. Create content type(s) - I don't like adding columns to lists... I use content types for everything... and I mean EVERYTHING. Even if it is going to be used in just one list, I still use content types. Create these guys in a Feature for the most portability and reuse.
  2. Create list template in Feature element manifest - Nothing special here... your typical node like the following:
    ListTemplate1
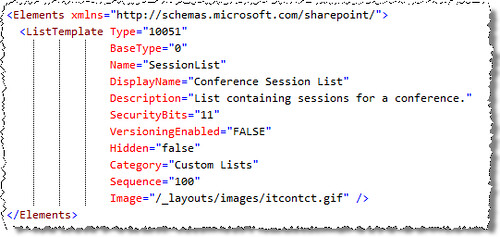
  3. Create the list template’s schema - Now for the nasty part everyone tries to avoid. Create a subfolder in your Feature with the name of the list. Now you need the list schema… here is where you are going to cheat and save time! Copy the schema.xml file from the OOTB Custom List template found in the Feature CustomList. Put that schema.xml file in your Feature, within the folder you just created.
    ListProject1
    Why use the schema.xml file from CustomList? Great question: because it is the most bare bones schema file out there… it has the absolute minimum stuff in it (ie: fields, content types & views) you need to implement a list. I like starting from it and making a few tweaks.
  4. Update list schema.xml – The worst part about creating custom list definitions is the schema.xml file. But, if you start from a template, ala CustomList, it’s much easier. Now… make the following edits to schema.xml:
    1. Change the list schema’s metadata – set the title of the list and it’s URL:

      ListSchema1
    2. Add & remove content types – remove all the existing content types listed in the schema and add back just the one(s) you created previously:

      ListSchema2
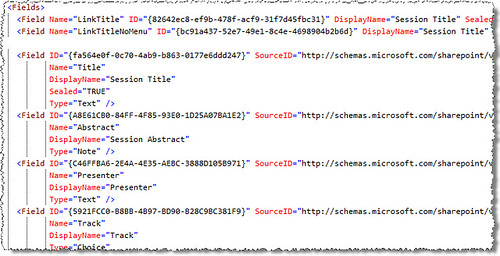
    3. Add the fields that will be in the list – next, you need to add all the fields that will be in the list… include all the fields on all the content types. Make sure to leave the two LinkTitle and LinkTitleNoMenu alone… those are the special ones we get in lists that hyperlink the list item to get the ECB menu or a link to the list item’s display page:

      ListSchema3
    4. Modify the node for the two default views – for the two default views, search for the node and add all the fields that should be shown in that view:

      ListSchema4
    But wait, what about those other views you want in your list? If you want to create them, go for it… but you do see all that CAML right? Forget it for now… I’ll come back to that topic…
  5. Now you can deploy it, but when testing I like to create an instance of the list template in the Feature deploying it (you can always remove it before deploying to production). There’s just one little trick when you create an instance of a list and you’re using content types, you need to do two things:
    1. First, you need to bind the content type to the list instance like this:

      ListInstance
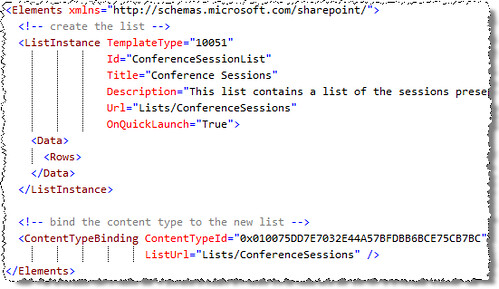
    2. Second, you need to configure the list to enable the use of content types. Unfortunately you have to do this through the API as the Feature schema doesn’t provide this option. Best pace for this: in your FeatureActivated receiver method:

      FeatureReceiver
So now you’ve got a brand new custom list template in just mere minutes! But what if you want to have some custom list views? This isn’t so bad… instead of creating them from scratch, use an IDE: the browser! After creating the view using the browser, use a tool like SharePoint Manager 2007 to get the source of the view and manually add it back into your schema.xml file.
SPManager
Now, to test your view by deleting all instances of the test list, deactivate the Feature and uninstall it… remove all instances of it. Now, try it again. Using this process I’ve been able to create list templates complete with two or three complex views in less than 15 or 20 minutes. Not so bad eh?

Monday, July 19, 2010

Impersonation .Net

1) What is Imperonation?
- Impersonation is the process of assigning a user account to an unknown user.By default, the anonymous access account is named IUSER_machinename. This account can be use to control anonymous users' access to resources on the server. This mechanism allows a server process to run using the security credentials of the client. When the server is impersonating the client, any operations performed by the server are performed using the client's credentials. Impersonation does not allow the server to access remote resources on behalf of the client.


2) How to implement impersonation in an ASP.NET application:

This article refers to the following Microsoft .NET Framework Class Library namespaces:
  • System.Web.Security
  • System.Security.Principal
  • System.Runtime.InteropServices
If you want to impersonate a user on a thread in ASP.NET, you can use one of the following methods, based on your requirments:


Note: You can use the following code to determine what user the thread is executing as:

System.Security.Principal.WindowsIdentity.GetCurrent().Name

2.1) 


Impersonate the IIS Authenticated Account or User


- To impersonate the Microsoft Internet Information Services (IIS) authenticating user on every request for every page in an ASP.NET application, you must include an tag in the Web.config file of this application and set the impersonate attribute to true. For example:


2.2) Impersonate a Specific User for All the Requests of an ASP.NET Application

 - To impersonate a specific user for all the requests on all pages of an ASP.NET application, you can specify the userName and password attributes in the tag of the Web.config file for that application. For example:


Note The identity of the process that impersonates a specific user on a thread must have the "Act as part of the operating system" privilege. By default, the Aspnet_wp.exe process runs under a computer account named ASPNET. However, this account does not have the required privileges to impersonate a specific user. You receive an error message if you try to impersonate a specific user. This information applies only to the .NET Framework 1.0. This privilege is not required for the .NET Framework 1.1.

To work around this problem, use one of the following methods:


  • Grant the "Act as part of the operating system" privilege to the ASPNET account (the least privileged account).Note Although you can use this method to work around the problem, Microsoft does not recommend this method.
  • Change the account that the Aspnet_wp.exe process runs under to the System account in the configuration section of the Machine.config file.
2.3) Impersonate the Authenticating User in Code
- To impersonate the authenticating user (User.Identity) only when you run a particular section of code, you can use the code to follow. This method requires that the authenticating user identity is of type WindowsIdentity.
For example: 
VS C#:  
System.Security.Principal.WindowsImpersonationContext impersonationContext;
impersonationContext = 
    ((System.Security.Principal.WindowsIdentity)User.Identity).Impersonate();

//Insert your code that runs under the security context of the authenticating user here.

impersonationContext.Undo();

2.4) Impersonate a Specific User in Code
To impersonate a specific user only when you run a particular section of code, use the following code:


using System.Web
using System.Web.Security 
using System.Security.Principal
using System.Runtime.InteropServices


public const int LOGON32_LOGON_INTERACTIVE = 2;
public const int LOGON32_PROVIDER_DEFAULT = 0;


WindowsImpersonationContext impersonationContext; 


[DllImport("advapi32.dll")]
public static extern int LogonUserA(String lpszUserName, 
String lpszDomain,
String lpszPassword,
int dwLogonType, 
int dwLogonProvider,
ref IntPtr phToken);
[DllImport("advapi32.dll", CharSet=CharSet.Auto, SetLastError=true)]
public static extern int DuplicateToken(IntPtr hToken, 
int impersonationLevel,  
ref IntPtr hNewToken);
                          
[DllImport("advapi32.dll", CharSet=CharSet.Auto, SetLastError=true)]
public static extern bool RevertToSelf();


[DllImport("kernel32.dll", CharSet=CharSet.Auto)]
public static extern  bool CloseHandle(IntPtr handle);


public void Page_Load(Object s, EventArgs e)
{
if(impersonateValidUser("username", "domain", "password"))
{
//Insert your code that runs under the security context of a specific user here.
undoImpersonation();
}
else
{
//Your impersonation failed. Therefore, include a fail-safe mechanism here.
}
}


private bool impersonateValidUser(String userName, String domain, String password)
{
WindowsIdentity tempWindowsIdentity;
IntPtr token = IntPtr.Zero;
IntPtr tokenDuplicate = IntPtr.Zero;


if(RevertToSelf())
{
if(LogonUserA(userName, domain, password, LOGON32_LOGON_INTERACTIVE, 
LOGON32_PROVIDER_DEFAULT, ref token) != 0)
{
if(DuplicateToken(token, 2, ref tokenDuplicate) != 0) 
{
tempWindowsIdentity = new WindowsIdentity(tokenDuplicate);
impersonationContext = tempWindowsIdentity.Impersonate();
if (impersonationContext != null)
{
CloseHandle(token);
CloseHandle(tokenDuplicate);
return true;
}
}

}
if(token!= IntPtr.Zero)
CloseHandle(token);
if(tokenDuplicate!=IntPtr.Zero)
CloseHandle(tokenDuplicate);
return false;
}


private void undoImpersonation()
{
impersonationContext.Undo();
}


Note The identity of the process that impersonates a specific user on a thread must have the "Act as part of the operating system" privilege if the Aspnet_wp.exe process is running on a Microsoft Windows 2000-based computer. The "Act as part of the operating system" privilege is not required if the Aspnet_wp.exe process is running on a Windows XP-based computer or on a Windows Server 2003-based computer. By default, the Aspnet_wp.exe process runs under a computer account named ASPNET. However, this account does not have the required privileges to impersonate a specific user. You receive an error message if you try to impersonate a specific user. .

To work around this problem, use one of the following methods:


  • Grant the "Act as part of the operating system" privilege to the ASPNET account.Note We do not recommend this method to work around the problem.
  • Change the account that the Aspnet_wp.exe process runs under to the System account in the configuration section of the Machine.config file.

Sunday, July 18, 2010

LUHN Algorithm in C# and LINQ

(Copyright from: Just Agile.com)
The LUHN algorithm is commonly used in credit card verification schemes on e-commerce websites. It provides a simple means of verifying that a user has entered their credit card number correctly.
The LUHN algorithm works by taking a series of digits and applying a checksum. The digits are valid if the checksum modulo 10 is equal to 0.
The checksum is calculated as follows: assuming each digit is indexed from right to left: D(N)D(N - 1)...D(4)D(3)D(2)D(1), then compute the sum D(1) + 2 x D(2) + D(3) + 2 x D(4) + D(5) + 2 x D(6) + etc. Basically, every even digit in the sum is doubled. The remainder of the sum after dividing by 10 gives the final value of the checksum.

LUHN Checksum

It's a great example of LINQ and I don't think you'll find a more concise implementation anywhere else (one line if you remove the formatting, and it handles removing white space)!
public static int ComputeChecksum(string value)
{
    return value
        .Where(c => Char.IsDigit(c))
        .Reverse()
        .SelectMany((c, i) => ((c - '0') << (i & 1)).ToString())
        .Sum(c => c - '0') % 10;
}
To validate based on the checksum:
public static bool IsValid(string value)
{
   return ComputeChecksum(value) == 0;
}
This example uses the following namespaces:
using System;
using System.Collections.Generic;
using System.Linq;

Notes

Wikipedia states that some credit card companies allow 5 as well as 0 to be valid values for the checksum, however, I've never come accross this scenario in the UK, so let me know if you have!

Tuesday, July 6, 2010

Render Pattern not working in SharePoint 2010

SharePoint 2010 uses an XSLT rendering system for displaying field values in list views. If you have custom field types that use the construct for modifying the display value of a field in SharePoint 2007 you will find this no longer works. But backwards compatability saves the day, just add TRUE into your field type declaration and the XSLT rendering will be ignored and legacy CAML rendering will take its place.

XSLT rendering is still used to render the field value, but the value is first transformed using the CAML render pattern before being passed into the XSLT

Image

Thursday, July 1, 2010

Convert List/IEnumerable to DataTable/DataView

Here’s a method to convert a generic List to a DataTable. This can be used with ObjectDataSource so you get automatic sorting, etc.
01///
02/// Convert a List{T} to a DataTable.
03///
04private DataTable ToDataTable(List items)
05{
06    var tb = new DataTable(typeof (T).Name);
07 
08    PropertyInfo[] props = typeof (T).GetProperties(BindingFlags.Public | BindingFlags.Instance);
09 
10    foreach (PropertyInfo prop in props)
11    {
12        Type t = GetCoreType(prop.PropertyType);
13        tb.Columns.Add(prop.Name, t);
14    }
15 
16    foreach (T item in items)
17    {
18        var values = new object[props.Length];
19 
20        for (int i = 0; i < props.Length; i++)
21        {
22            values[i] = props[i].GetValue(item, null);
23        }
24 
25        tb.Rows.Add(values);
26    }22/
27 
28    return tb;
29}
30 
31///
32/// Determine of specified type is nullable
33///
34public static bool IsNullable(Type t)
35{
36    return !t.IsValueType || (t.IsGenericType && t.GetGenericTypeDefinition() == typeof(Nullable<>));
37}
38 
39///
40/// Return underlying type if type is Nullable otherwise return the type
41///
42public static Type GetCoreType(Type t)
43{
44    if (t != null && IsNullable(t))
45    {
46        if (!t.IsValueType)
47        {
48            return t;
49        }
50        else
51        {
52            return Nullable.GetUnderlyingType(t);
53        }
54    }
55    else
56    {
57        return t;
58    }
59}