This article is not intended to be a tutorial on NgRx. There are several great resources that currently exist, written by experts much smarter than me. I highly suggest that you take time and learn NgRx and the redux pattern before attempting to implement these concepts.
The following represents a pattern that I’ve developed at my day job after building several enterprise Angular applications using the NgRx library. I have found that most online tutorials do a great job of helping you to get your store up and running, but often fall short of illustrating best practices for clean separation of concerns between your store feature slices, root store, and user interface.
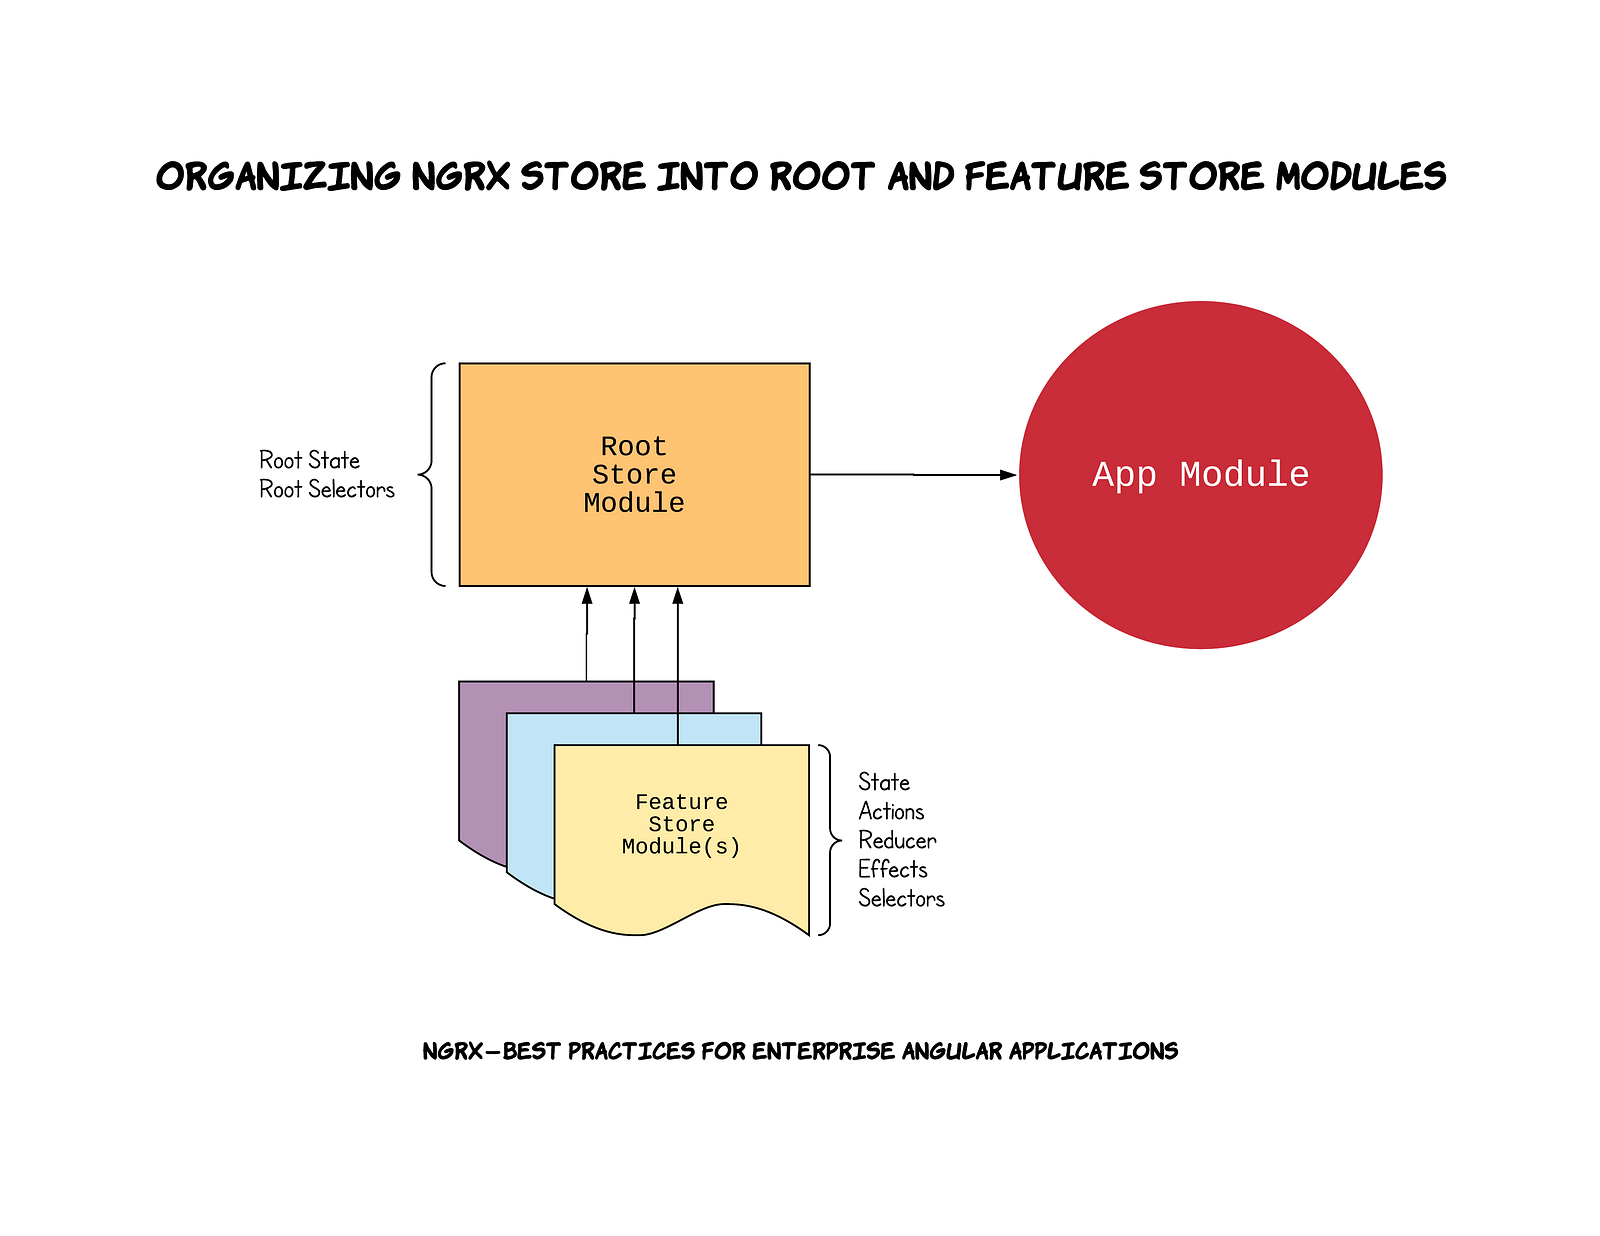
With the following pattern, your root application state, and each slice (property) of that root application state are separated into a RootStoreModuleand per feature MyFeatureStoreModule.
Prerequisites
This article assumes that you are building an Angular v6 CLI generated application.
Installing NgRx Dependencies
Before we get started with generating code, let’s make sure to install the necessary NgRx node modules from a prompt:
Create a Root Store Module as a proper Angular NgModule’s that bundle together NgRx store logic. Feature store modules will be imported into the Root Store Module allowing for a single root store module to be imported into your application’s main App Module.
Suggested Implementation
Generate RootStoreModule using the Angular CLI:
ng g module root-store —-flat false —-module app.module.ts
2. Generate RootState interface to represent the entire state of your application using the Angular CLI:
ng g interface root-store/root-state
This will create an interface named RootState but you will need to rename it to State inside the generated .ts file as we want to later on utilize this as RootStoreState.State
PLEASE NOTE: You will come back later on and add to this interface each feature module as a property.
Best Practice #2 — Create Feature Store Module(s)
Create feature store modules as proper Angular NgModule’s that bundle together feature slices of your store, including state, actions, reducer, selectors, and effects. Feature modules are then imported into your RootStoreModule. This will keep your code cleanly organizing into sub-directories for each feature store. In addition, as illustrated later on in the article, public actions, selectors, and state are name-spaced and exported with feature store prefixes.
Naming Your Feature Store
In the example implementation below we will use the feature name MyFeature, however, this will be different for each feature you generate and should closely mirror the RootState property name. For example, if you are building a blog application, a feature name might be Post.
Entity Feature Modules or Standard Feature Modules?
Depending on the type of feature you are creating you may or may not benefit from implementing NgRx Entity. If your store feature slice will be dealing with an array of type then I suggest following the Entity Feature Module implementation below. If building a store feature slice that does not consist of a standard array of type, then I suggest following the Standard Feature Moduleimplementation below.
Suggested Implementation — Entity Feature Module
Generate MyFeatureStoreModule feature module using the Angular CLI:
ng g module root-store/my-feature-store --flat false --module root-store/root-store.module.ts
2. Actions — Create an actions.ts file in the app/root-store/my-feature-storedirectory:
3. State — Create a state.ts file in the app/root-store/my-feature-store directory:
4. Reducer — Create a reducer.ts file in the app/root-store/my-feature-storedirectory:
5. Selectors — Create a selectors.ts file in the app/root-store/my-feature-storedirectory:
6. Effects — Create an effects.ts file in the app/root-store/my-feature-storedirectory with the following:
Suggested Implementation — Standard Feature Module
Generate MyFeatureStoreModule feature module using the Angular CLI:
ng g module root-store/my-feature-store --flat false --module root-store/root-store.module.ts
2. Actions — Create an actions.ts file in the app/root-store/my-feature-storedirectory:
3. State — Create a state.ts file in the app/root-store/my-feature-store directory:
4. Reducer — Create a reducer.ts file in the app/root-store/my-feature-storedirectory:
5. Selectors — Create a selectors.ts file in the app/root-store/my-feature-storedirectory:
6. Effects — Create an effects.ts file in the app/root-store/my-feature-storedirectory with the following:
Suggested Implementation — Entity and Standard Feature Modules
Now that we have created our feature module, either Entity or Standard typed above, we need to import the parts (state, actions, reducer, effects, selectors) into the Angular NgModule for the feature. In addition, we will create a barrel export in order to make imports in our application components clean and orderly, with asserted name-spaces.
Update the app/root-store/my-feature-store/my-feature-store.module.tswith the following:
2. Create an app/root-store/my-feature-store/index.tsbarrel export. You will notice that we import our store components and alias them before re-exporting them. This in essence is “name-spacing” our store components.
Best Practice #1 — The Root Store Module (cont.)
Now that we have built our feature modules, let’s pick up where we left off in best practice #1 and finish building out our RootStoreModule and RootState.
Suggested Implementation (cont.)
3. Update app/root-store/root-state.ts and add a property for each feature that we have created previously:
4. Update your app/root-store/root-store.module.ts by importing all feature modules, and importing the following NgRx modules: StoreModule.forRoot({}) and EffectsModule.forRoot([]):
5. Create an app/root-store/selectors.ts file. This will hold any root state level selectors, such as a Loading property, or even an aggregate Error property:
6. Create an app/root-store/index.ts barrel export for your store with the following:
Wiring up the Root Store Module to your Application
Now that we have built our Root Store Module, composed of Feature Store Modules, let’s add it to the main app.module.ts and show just how neat and clean the wiring up process is.
Add RootStoreModule to your application’s NgModule.imports array. Make sure that when you import the module to pull from the barrel export:
import { RootStoreModule } from ‘./root-store’;
2. Here’s an example container component that is using the store:
Finished Application Structure
Once we have completed implementation of the above best practices our Angular application structure should look very similar to something like this:
Fully Working Example — Chuck Norris Joke Generator
I have put together a fully working example of the above best practices. It’s a simple Chuck Norris Joke Generator that has uses @angular/material and the http://www.icndb.com/ api for data.
I need my build agent to auto login and start in interactive mode.
Solution:
Enable Windows auto login and add a shortcut to the startup folder.
Explanation:
I run Coded UI and Selenium UI test using my build agent. To do so the agent must be run in interactive mode. However, if you configure your agent to run interactive, it will not restart automatically after a reboot. If your system is configured to automatically install updates, your server may get rebooted without you knowing and prevent your agent from starting.
To solve this you can configure Windows to automatically log in a user and start the agent in interactive mode for you. To begin we need to enable automatic log in.
Press Windows Key + R to open the Run dialog
Type in the following and press enter:
control userpasswords2
Uncheck the box for User must enter a user name and password to use this computer.
Click the Apply button You will be prompted by an Automatically sign in dialog
Enter the password for the user
Click OK
Click OK on the Users Accounts dialog
Now every time your machine is rebooted the configured user will automatically login to the machine.
Now we need to make sure that once the user is logged in that our agent starts in interactive mode. To do this we are going to create a shortcut that will start our agent then simply place that shortcut in the startup folder for Windows.
Right-click the desktop
Select New / Shortcut
Enter cmd
Click Next
Change the name to Start Agent
Click Finish
Right-click on the new shortcut
Select Properties
Append /c {pathToVsoagent.exe} to the target If you installed your agent to C:\Agent, your target should look like this: C:\Windows\System32\cmd.exe /c c:\agent\agent\vsoagent.exe
Click OK
If you double click the shortcut, your agent will start in interactive mode. Now we need to copy this shortcut into the startup folder for Windows. This will ensure that each time we login the agent is started.
Press Windows Key + R to open the Run dialog
Type in the following
shell:startup
Click OK This will open the Startup folder in Windows Explorer.
Drag and drop the shortcut to this folder
Now whenever your machine is restarted your agents will start up in interactive mode.
Now that we've defined our model, we'll move onto creating an action.
Creating an Action
An action in Ngrx/store is two things:
A type in the form of a string. It describes what's happening.
It contains an optional payload of data.
So, think of an action as your mailman who delivers you a message "Hey, add this package to your shelf." It's up to you to determine where and how you're going to add that package, which is called a reducer, (we'll get to that shortly).
Create the following folder and file: /src/app/actions/tutorial.actions.ts with the following contents:
I'm going to dissect the above 4 sections so that you can understand what's happening:
Seciton 1 Here, we're simply importing our Tutorial model and Action from ngrx/store. This makse sense, being that we're working with actions.
Section 2 We're defining the type of action, which is in the form of a string constant.
Section 3 We're creating a class for each action with a constructor that allows us to pass in the payload. This isn't a required step, but it does provide you with strong typing.
Section 4 We're exporting all of our action classes for use within our upcoming reducer.
Creating a Reducer
Now that we have a model and our actions, we need to create a reducer. A reducer is what takes the incoming action and decides what to do with it. It takes the previous state and returns a new state based on the given action.
Create the following folder and file: /src/app/reducers/tutorial.reducer.ts with the following contents:
Section 1 Here, we're defining an initial or default state. This isn't required if you don't want to define a state right out of the box.
Section 2 This is our actual reducer. It takes in a state, which we're defining as a Tutorial type and we've optionally bound it to initialState. It also takes in the action from our /actions/tutorial.actions file.
Section 3 First, we use a switch to determine the type of action. In the case of adding a tutorial, we return the new state with the help of our newState() function. We're simply passing in the previous state in the first parameter, and then our action in the second.
In the event that the action.type does not match any cases, it will simply return the state, as provided in the first parameter of our reducer.
Whew!
Creating an App State
Don't worry, we're almost done with the setup work here. One last thing we need to do is to define an app state.
We will import this file within the components that we wish to access ngrx.
Updates to App.Module
We need to import @ngrx/store and our reducer.
Open up /src/app/app.module.ts and update the following:
// Other imports removed for brevityimport{ StoreModule }from'@ngrx/store';import{ reducer }from'./reducers/tutorial.reducer';
@NgModule({// Other code removed for brevity
imports:[
BrowserModule,
StoreModule.forRoot({
tutorial: reducer
})],// Other code removed for brevity
Generating Components
Let's go ahead and generate two components for handling reading from ngrx/store, and writing to it.
In your console within the project, type:
> ng g c read
> ng g c create
Reading from Ngrx Store
Open up /src/app/read/read.component.ts and import the following:
import{ Observable }from'rxjs/Observable';import{ Store }from'@ngrx/store';import{ Tutorial }from'./../models/tutorial.model';import{ AppState }from'./../app.state';
Section 1 We're defining an observable named tutorials which we will later display in the template.
Section 2 We're accessing the store from ngrx within the constructor, and then selecting tutorial which is defined as a the property from app.module.ts in StoreModule.forRoot({}). This calls the tutorial reducer and returns the tutorial state.
Next, visit /src/app/read/read.component.html and paste the following HTML:
<divclass="right"*ngIf="tutorials"><h3>Tutorials</h3><ul><li*ngFor="let tutorial of tutorials | async"><a[href]="tutorial.url"target="_blank">{{ tutorial.name }}</a></li></ul></div>
Then, visit /src/app/app.component.html and paste:
<app-create></app-create><app-read></app-read>
And while we're dealing with non-ngrx stuff at the moment, visit /src/styles.css and paste the following CSS rulesets:
The main area of focus is store.dispatch which takes in the object containing a name and url property.
Open /src/app/create/create.component.html and paste the following:
<divclass="left"><inputtype="text"placeholder="name"#name><inputtype="text"placeholder="url"#url><button(click)="addTutorial(name.value,url.value)">Add a Tutorial</button></div>
Normally, we would use Reactive Forms for this, but that would extend beyond the scope of this tutorial.
Save the project and you will see the following:
Try adding a tutorial:
Awesome. As you can see, our observale on the right is updated with data we submitted to Ngrx store.
Let's try dispatching another action that will allow us to remove a tutorial.
Removing from Ngrx Store
To give us some more muscle memory, let's try removing tutorials on click.
Visit /src/app/read/read.component.html and modify the li line to:
<li(click)="delTutorial(i)"*ngFor="let tutorial of tutorials | async; let i = index">
This will pass the index of the currently clicked list item to a function called delTutorial().
Open read.component.ts and make the following adjustments:
// Import our actions at the topimport*as TutorialActions from'./../actions/tutorial.actions';// In the class, add:delTutorial(index){this.store.dispatch(newTutorialActions.RemoveTutorial(index))}
This will call our RemoveTutorial action and pass in the index.
Now, let's visit /src/app/reducers/tutorial.reducer.ts and add another case:
We're simply using .splice to modify the state and then we return it.
Now, try it out in the browser! Try clicking on (or to the right) of one of the list items, and it will be removed.
Conclusion
That's Ngrx Store in a nutshell. Of course, there's a lot more to it, but you should have a basic understanding. Shortly, I will create a new tutorial that will take a look at using Ngrx Store for making actual API calls.