This article is not intended to be a tutorial on NgRx. There are several great resources that currently exist, written by experts much smarter than me. I highly suggest that you take time and learn NgRx and the redux pattern before attempting to implement these concepts.
The following represents a pattern that I’ve developed at my day job after building several enterprise Angular applications using the NgRx library. I have found that most online tutorials do a great job of helping you to get your store up and running, but often fall short of illustrating best practices for clean separation of concerns between your store feature slices, root store, and user interface.
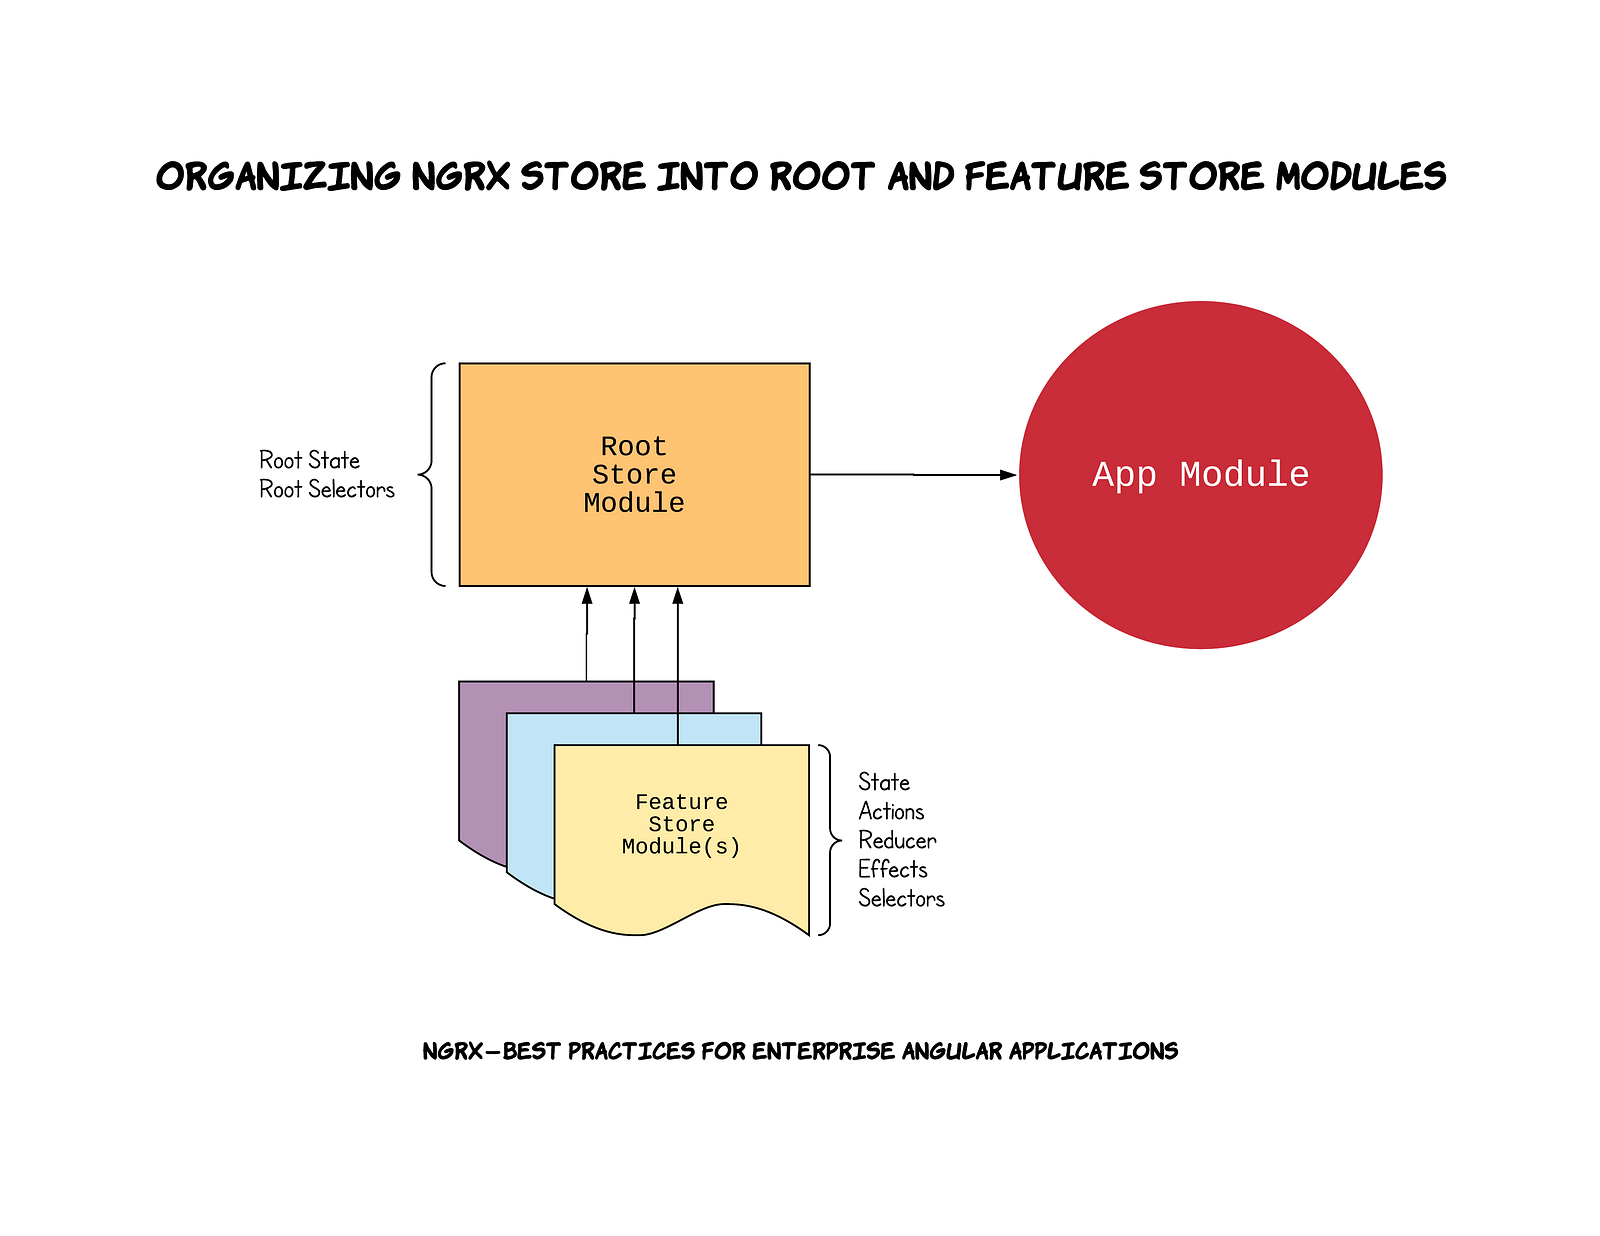
With the following pattern, your root application state, and each slice (property) of that root application state are separated into a RootStoreModuleand per feature MyFeatureStoreModule.
Prerequisites
This article assumes that you are building an Angular v6 CLI generated application.
Installing NgRx Dependencies
Before we get started with generating code, let’s make sure to install the necessary NgRx node modules from a prompt:
Create a Root Store Module as a proper Angular NgModule’s that bundle together NgRx store logic. Feature store modules will be imported into the Root Store Module allowing for a single root store module to be imported into your application’s main App Module.
Suggested Implementation
Generate RootStoreModule using the Angular CLI:
ng g module root-store —-flat false —-module app.module.ts
2. Generate RootState interface to represent the entire state of your application using the Angular CLI:
ng g interface root-store/root-state
This will create an interface named RootState but you will need to rename it to State inside the generated .ts file as we want to later on utilize this as RootStoreState.State
PLEASE NOTE: You will come back later on and add to this interface each feature module as a property.
Best Practice #2 — Create Feature Store Module(s)
Create feature store modules as proper Angular NgModule’s that bundle together feature slices of your store, including state, actions, reducer, selectors, and effects. Feature modules are then imported into your RootStoreModule. This will keep your code cleanly organizing into sub-directories for each feature store. In addition, as illustrated later on in the article, public actions, selectors, and state are name-spaced and exported with feature store prefixes.
Naming Your Feature Store
In the example implementation below we will use the feature name MyFeature, however, this will be different for each feature you generate and should closely mirror the RootState property name. For example, if you are building a blog application, a feature name might be Post.
Entity Feature Modules or Standard Feature Modules?
Depending on the type of feature you are creating you may or may not benefit from implementing NgRx Entity. If your store feature slice will be dealing with an array of type then I suggest following the Entity Feature Module implementation below. If building a store feature slice that does not consist of a standard array of type, then I suggest following the Standard Feature Moduleimplementation below.
Suggested Implementation — Entity Feature Module
Generate MyFeatureStoreModule feature module using the Angular CLI:
ng g module root-store/my-feature-store --flat false --module root-store/root-store.module.ts
2. Actions — Create an actions.ts file in the app/root-store/my-feature-storedirectory:
3. State — Create a state.ts file in the app/root-store/my-feature-store directory:
4. Reducer — Create a reducer.ts file in the app/root-store/my-feature-storedirectory:
5. Selectors — Create a selectors.ts file in the app/root-store/my-feature-storedirectory:
6. Effects — Create an effects.ts file in the app/root-store/my-feature-storedirectory with the following:
Suggested Implementation — Standard Feature Module
Generate MyFeatureStoreModule feature module using the Angular CLI:
ng g module root-store/my-feature-store --flat false --module root-store/root-store.module.ts
2. Actions — Create an actions.ts file in the app/root-store/my-feature-storedirectory:
3. State — Create a state.ts file in the app/root-store/my-feature-store directory:
4. Reducer — Create a reducer.ts file in the app/root-store/my-feature-storedirectory:
5. Selectors — Create a selectors.ts file in the app/root-store/my-feature-storedirectory:
6. Effects — Create an effects.ts file in the app/root-store/my-feature-storedirectory with the following:
Suggested Implementation — Entity and Standard Feature Modules
Now that we have created our feature module, either Entity or Standard typed above, we need to import the parts (state, actions, reducer, effects, selectors) into the Angular NgModule for the feature. In addition, we will create a barrel export in order to make imports in our application components clean and orderly, with asserted name-spaces.
Update the app/root-store/my-feature-store/my-feature-store.module.tswith the following:
2. Create an app/root-store/my-feature-store/index.tsbarrel export. You will notice that we import our store components and alias them before re-exporting them. This in essence is “name-spacing” our store components.
Best Practice #1 — The Root Store Module (cont.)
Now that we have built our feature modules, let’s pick up where we left off in best practice #1 and finish building out our RootStoreModule and RootState.
Suggested Implementation (cont.)
3. Update app/root-store/root-state.ts and add a property for each feature that we have created previously:
4. Update your app/root-store/root-store.module.ts by importing all feature modules, and importing the following NgRx modules: StoreModule.forRoot({}) and EffectsModule.forRoot([]):
5. Create an app/root-store/selectors.ts file. This will hold any root state level selectors, such as a Loading property, or even an aggregate Error property:
6. Create an app/root-store/index.ts barrel export for your store with the following:
Wiring up the Root Store Module to your Application
Now that we have built our Root Store Module, composed of Feature Store Modules, let’s add it to the main app.module.ts and show just how neat and clean the wiring up process is.
Add RootStoreModule to your application’s NgModule.imports array. Make sure that when you import the module to pull from the barrel export:
import { RootStoreModule } from ‘./root-store’;
2. Here’s an example container component that is using the store:
Finished Application Structure
Once we have completed implementation of the above best practices our Angular application structure should look very similar to something like this:
Fully Working Example — Chuck Norris Joke Generator
I have put together a fully working example of the above best practices. It’s a simple Chuck Norris Joke Generator that has uses @angular/material and the http://www.icndb.com/ api for data.
No comments:
Post a Comment